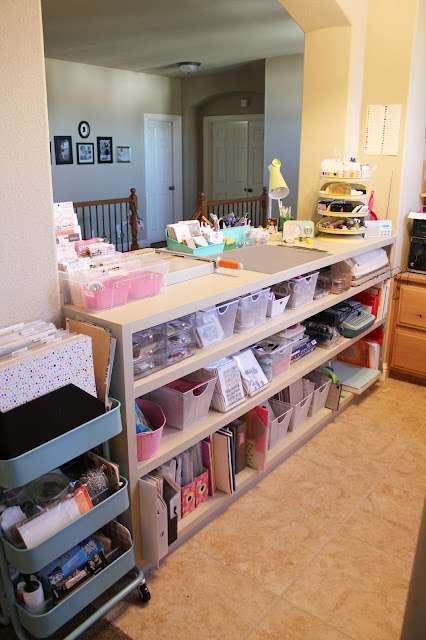
Here is where I stand as of right now
A little over a year ago my husband built this counter and shelf unit for me (you can see my posts on it here, here and here) and its been great. It holds everything I need it to hold and it completely transformed the space and made it much more usable than it was originally.
The first thing you see when you enter is my Raskog cart. I use the top tier to hold 4 paper organizers. The front one is pattern paper, the second is colored cardstock, the third is a continuation of colored cardstock and woodgrain paper and the fourth is all specialty paper like vellum, transparencies, glitter cardstock stuff like that. The two lower bins are all things I don't need that often so they're stored here, larger size punches, blank tags, etc.
Underneath the counter I have most of my supplies. I'll walk you through what's in each below. All of the white wire bins were purchased at Target in the dollar section. Whenever I see them come back I buy a few more, they fit perfectly on these shelves and I can pull them out as needed.
- These clear acrylic drawers hold odds and ends like seasonal sequins, seasonal stuff, misc. die cuts, tabs, sequin bits I want to hide from my daughter, ha!
- This bin holds all of my 6x6 paper pads and some extra stock of journaling cards that I have purchased
- Large veneer pieces and back stock of veneer sets that I love
- Leftover Project Life kit cards from previous months, I still go back to past months all the time so I keep them handy
- My washi collection
- My larger stamp press, stamp cleaning pad and baby wipes for clean up
- Embroidery floss and twine and this is where I keep the Amy Tangerine stitching templates.
- Rubber stamps, this bin is all Studio Calico (I'll talk more below)
- Rubber stamps, all other manufactures and designers
- Misc. wood handled rubber stamps, small wood alpha stamps, a few Prima sets and some stamps from Typo
- A bin of pigment ink pads and embossing powders and a roll of waxed paper
- These paper bins hold lots of things like 12x12 alpha sheets, large size sticker sheets, all of my masks, specialty materials for the Silhouette and odd size page protectors
- My supply of various watercolor papers
- A small stash of specialty mini albums and my still incomplete This is Me album along with supplies for it and the bag is a bunch of memorabilia I want to include in it
- Thickers and letter stickers these are colors. They are sorted by color and I made tall dividers from chipboard
- Thickers and letter stickers these are black, white, brown/kraft, gold and silver
- my Letterpress supplies; inks, plates, paper, etc.
18. Sequins, veneer and other small embellishments
19. My Silhouette Cameo
20. A bin that holds my heat embossing tool, a small trimmer, a small cutting mat, a glass cutting
mat and my ancient Creative Memories circle cutter
21. My typewriter (its usually covered so it doesn't get dusty)
22. 4x6 Photo paper, some older magazines I've kept and a binder of class handouts from
previous classes I've taken.
23. My letterpress plate and Cuttlebug
24. My Cameo mats (old and new) and my supply of 12x12 Project Life protectors in the boxes
25. Regular paper for my printer and 8 1/2 x 11 sheets of photo paper and matte photo paper.
Here you can see how the Cameo pulls out for cutting. There is enough room in back for the mat to feed all the way thru the machine. I just pull it out when I need it and push it back in out of the way when I don't.
I'm a see it or I won't use it type of person so on top of my counter I have these two Ikea Samla bins for embellishments. I was using the Antonius inserts but find that these offer more flexibility because the sides are completely open so for odd size packs of embellishments I don't have to worry about the size of the bins, they all fit in. I put a few smaller plastic bins inside to hold loose items like alphas and misc. cuts that have come with the kits and such.
My Tonic trimmer sits right next to that.
In the middle of the counter I have a Fiskars cutting mat that I use as a work surface, mainly so the painted counter doesn't get too messed up. Behind it I have a two containers from Land of Nod, the left has my current Project Life kit cards and some special ones I haven't used yet, some letterpress cards I made, some special packs of cards I've purchased, the 4x6 kit cards and the mini alphas that come in the kits. Next to it on the right is the other Land of Nod container that I use for all of my tools and pens. In front I have a container that holds my Peerless watercolor papers and a little organizer that holds special paper clips, some flair and other specialty bits from the kits. The little round tub holds small embellishments from the last few kits that I haven't put away yet or that I still want to use.
To the right of my mat I have a light, my husband pulled the electrical outlet that he covered when he installed the counter up to the top so I could still use it, my radio also plugs in here. My Harbor Freight rack (that I spoke about in detail here) holds all kinds of stuff as you can see. Mists, acrylic blocks, my most used stamp pads, all of my roller stamps, my adhesives and small tools.
When I initially moved all my stamps to the Avery Elle pockets last week I had them in one of the Samla boxes I have on top of my desk. It worked really well and I did like it but my stamps were a bit tight and I couldn't flip thru them as well as I liked. While I was shopping at Home Goods I found these bins for organizing your pantry and they are a better fit. The best thing is they fit on my shelf.
I ran the cardstock inserts thru my printer and added the stamp manufacturer/designer on each in the upper left corner and that's probably all of the labeling I'll do. I like to be able to move things around so labeling the card stock and not the outside of the sleeve means I can move things around as needed. In this bin that is all Studio Calico I have them sorted but not too rigidly; in the front are all alpha sets, then the larger 4x6 sheets, the slim 1x6 sets, then the smaller 2x2 or odd size sets (I combined as many as I could fit in one sleeve as you can see above) and last are the red foam mounted background stamps. I did not adhere the sets to the cardstock and even with standing upright, they don't move around inside which is a plus for maximizing space.
The other bin is sorted alphabetically by manufacturer/designer name.
I purchased 75 sleeves and inserts and used 70 of them between the two bins. There are tons of stamps in these 70 sleeves so they are awesome for holding lots of stamps.
This is the view as you walk in, there is a counter with my computer, printer, nasty cords that need dealing with, some shelves with bits on them and a larger work surface that I lay stuff out on. The natural light from the two windows is awesome except in the afternoon, (it faces east) so my mom made the sheer curtains for me to help block out the glare without loosing the light. My husband also recently changed out the overhead light for me. It was a flush mounted fixture but because the ceiling is so high in the space it didn't give much light at night. I purchased a 5 light chandelier that directs the light downward an its made a huge difference at night.
So that's pretty much it, if you have more questions let me know.
Edited: I have revised my craft space tour, if you are interested you can see the updated tour right here.


great storage ideas!
ReplyDeleteDawn
dmg314 on IG
Thanks Dawn!
DeleteI LOVE your space! I've gotten some great ideas as to what to do with mine! TFS! Hugs, JoAnn (joboogie77 on IG)
ReplyDeleteThanks Jo, I'm so glad it helped. I get so many ideas from others that's why I try to share if something is working for me.
Deleteso beautiful! I want to come & play! :)
ReplyDeleteYou're a peach and I love you, you can come play anytime.
DeleteI just love your room! You have the perfect space, bin or basket for everything. :)
ReplyDeleteI'm a compartmentalizer through and through! Luckily the dollar spot keeps me in containers so easily! xo
DeleteI wish my space was as organized as yours! I got some great idea's too :)
ReplyDeleteThanks Kimberly!
Deleteone word.... beautiful! loved looking at your space! I am totally feelin that pastel yellow! I really enjoyed seeing the avery elle stamp packaging... I was not quiet sure how people were packaging their stamps. I def need them as my stamps are now getting out of control. I'm trying to limit my craft spending- but geeze it's so hard!
ReplyDeleteHave an awesome day!
Thanks for sharing!
Jossie :)
Thanks Jossie, you will be amazed at how much they hold, the white background makes it so much easier to see them, I hope you try it.
DeleteLoved this tour of your crafting space!
ReplyDeletelove your room! thanks for sharing!
ReplyDeleteuaow love the counter and the shelf with all the bins, practical space!!!
ReplyDeleteLove your space would love too see an updated post about your space. TFS it is really beatiful.
ReplyDeleteThanks Abby, my space was featured on the Studio Calico blog recently, you can see the few changes I have made there.
Deletehttp://www.studiocalico.com/blog/2014/2/5/workspace-wednesday-barbara-picinich
Lovin' that cameo pull out. If you ever want to make a ranch trip let me know, I've got some projects for your huz and we could craft away into the wee hours lol
ReplyDelete