Wednesday, June 24, 2015

Featuring Clearly Kelly │ June 2015

We are heading back out of town soon and as you know I take documenting my travels fairly seriously. This won't be a super long trip and its not really a road trip like we have taken in the past so it won't be days in the car like before. I knew I still needed something to hold all my notes and I also had quite a list of places to go to while we are in Portland which lead me to making my own travel planner per say just for this trip.


I used one of Kelly Purkey's Wallet Album that she designed for the Clearly Kelly Line and I think these things are totally genius. You can use them for so many different things. I dressed up the album cover using stamps from the PNW is Best set and one from the Destination stamp set. The lable on the front was cut using the Documented Stamp & Die set.

For the inside I decided to make two separate books for myself. The front book would hold all of the places that I hoped to visit so I made the sheets inside the book a little smaller so I could add the tabs for each section. I love the dies in the Stamp & Cut set and laid out the text first in Photoshop Elements and printing it out onto cardstock and then I ran them thru my die cut machine to cut the tab shape. I layered two of the tabs for each section just to make them stronger since it was just cardstock that I was using. I love the pop of green that carries over from the cover. I used stamps to dress up each divider and the coffee and donut are from the PNW is Best set. I also made up a few journaling cards to tuck into the front pockets of the wallet to jot down some stories as they come up. The stamps I used on these came from the 100% Me stamp set.


Here is a glimpse inside the To Eat section. I just made simple lists of all of the places I have heard about online and in my research. I don't plan to hit them all but at least all the ones I would like to hit are in one place and I can check them off if we go there.


For the second book which would hold all of my notes from the trip I just added the simple frame and noted stamps from the Documented Stamp & Cut set, More pops of green from the layered green cardstock underneath to keep things cohesive. The stamp I used on the card on the left is also from the 100% Me stamp set.


Here is what the inside of the notebooks look like. I made the inserts myself in Photoshop Elements. They are just simple dotted grey lines spaced about 1/4" apart. I printed them out myself at home on 32lb. paper so they had enough weight to hold up to lots of writing and wouldn't have a lot of bleed thru. I recently purchased a long arm stapler from Amazon and I love this thing. I know I'll be making little booklets a lot more now that I have figured it all out. For reference this book is 15 sheets of the 32lb paper and the cardstock cover and it stapled easily. As you can see here it was just about all the regular staples could handle. I think the limit on the stapler is 20 sheets but this is a bit thicker than standard copy paper so it worked out. I can't wait to fill up this section with all of our travel notes!


Because I was on a roll using the tab dies I decided to make a Project Life® spread about our camping trip. I wanted to pair one spread up with the layout I had already made and since a mini album will also be made I didn't need to worry too much about getting it all in.


I used all three of the tab dies in the Stamp & Cuts set and one from the Scored Tabs set and love how these look. I added text to one and the top and the others were stamped on using stamps from the 100% Me set and the Get it Done stamp set. I love how the flag die looks layered on top of each other and wanted to mimic what I had done on the layout. Adding in that simple layer of flags on my journaling card makes me all kinds of happy. I love when just a simple touch can make a card sing.


Here you can see some of the tabs a bit closer and in more detail.


I hope you have fun playing with these tab dies too. They really are super versatile and can be used for more than just a tab or a label.

Because of our trip I'll be taking a bit of a blog break and will be back after the July 4th holiday to share some more stuff with you all. I'll be posting to Instagram as always so if you don't already follow you can find my feed here.
blog signature 012615

Monday, June 22, 2015

Summer fun with Color Cast Designs

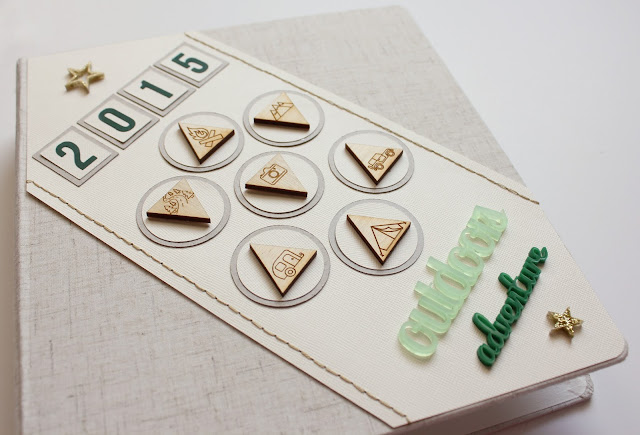
It's been a crazy whirlwind around here, as you know we went camping recently and right before we left on that trip I whipped up an album cover because I knew that I would have lots of great pictures and wanted to make a special album for them. And luckily for me the Color Cast Designs May release had the perfect items to help with that cover.


I suppose once a Scout always a Scout because lying in bed crazy early one morning the thought popped into my head to turn the Happy Trails Triangle set into badges like I had on my Scout sash when I was a kid. I love how this turned out and adding in the acrylic pieces from the Wanderlust set really made the cover complete.


I always love the dimensions these pieces provide and on an album cover its that much more awesome.

My second project was a Project Life® spread that had one side pockets and the other side a full layout. I always love adding in full size layouts and the yellow Sunshine from the Summer Love set just needed to have its own moment.


I added in some hand stitched sun rays to help ground the page and love how that extra pop of yellow plays off of the acrylic piece.


I kept the pocket side really simple. I made a really quick template in Photoshop Elements to mimic Polaroid prints so that I could add in veneer pieces from the Summertime kit and also add in some printed text so the whole look would be cohesive. I really love that Jessica is now offering acrylic alpha's and the Lemon Zest alpha was the exact match to the Sunshine piece. It makes for the perfect title card and love carrying some of that yellow over to the right hand side. I used a few pieces from previous releases on this side that are still available. If you love coffee I suggest you grab the Coffee Lover's set before they are gone for good and the Hashtag set is super cool and fun to add to your projects.


I hope you have a great summer I'll be back soon with more stuff to share as I keep catching up with all that I am behind on.
blog signature 012615

Friday, June 19, 2015

Kelly Purkey's June release

It's release day over at Kelly Purkey's shop and its a super, super fun one so make sure you check all the new stuff out, you can see everything right here. I made three projects that I want to share with you and I think you will really love everything that Kelly has done this month.

The first one combined two of the new items, the Love Joy alpha and the Happy Mail stamp set. The Love Joy alpha totally reminded me of days gone by, when travel was done right and air mail was the only way to communicate overseas. I made a super quick and easy card that took its cues from the Air mail stripe that was so popular ages ago.


I think this alpha looks amazing when embossed and I love how the blue pops against the background of the stripe. And what's not to love about that super cute flying airplane. I matched the outside of my envelope to the card and also made a little envelope seal by stamping on a piece of vellum.


My next project was a Project Life® spread using the Shutterbug kit. I love the colors of these cards and what's not to love about anything related to Instagram. It was a total bonus that I had just celebrated my 4th anniversary on Instagram so this spread was the perfect one to use with this kit.


I wanted to stamp everything and I love how well the stamps worked on top of these cards. Its so such fun to mix and match with this kit. I also ran a few of them thru my printer to add my text right on top and that worked great!


My last project was made using the Family stamp set. Every once in awhile you make friends that feel like family and these people are like my family. I loved that the family stamp set included that sentiment and had fun making a background for my photo to help convey the importance of these people to me. I just stamped randomly and kept adding the sentiments that I loved in as random of a pattern as I could. I layered it with two solid colors of paper and added my photo on top. I made a simple tag to help focus one of the larger sentiments right on the photo. I used two of the new Clearly Kelly tags to help anchor my date and it was done. This layout will go along with my Project Life spread about this weekend adventure and love that this photo will get the attention it deserves.


I hope you enjoy the shop update! I'll be back later this month with some more projects focusing on the Clearly Kelly products.
blog signature 012615

Monday, June 15, 2015

Branding your next camping trip


This past weekend we went camping with our friends. It was a family affair, four families and 9 kids. This was my first time camping a really, really long time and I wanted to try to do something special for our friends. Initially I thought of having t-shirts made but the cost to have them printed for all of us was a bit more than I wanted to spend. I remembered that one of the Dad's on this trip loved collecting Koozies when he traveled so I thought maybe that would be a good idea. A quick google search lead me to TotallyKoozies.com and I was super happy to see that yes I could upload my own art and have two dozen printed at a really reasonable cost. I picked the single color solid koozies for this trip but love that they also offer so many other styles based on what kind of beverages you wanted to keep cool.

I made the logo in Photoshop Elements using the information that totallykoozies specified on their website regarding what size to keep the designs too. I just upload my art when I placed my order and within one business day I had a proof back from their designers. They had amazingly quick turnaround and are willing to work with your deadline date so I had them in hand by the day I needed them. This was the most easy and hassle free ordering of a custom item online that I have ever experienced. Needless to say they were a HUGE hit with our friends and everyone really loved them. Here is a shot one of our friends posted to Facebook, they totally fit in with our surroundings.


Since those were primarily for the adults I wanted to do something fun for the kids so I thought it would be fun to turn the logo into a temporary tattoo. I purchased the Silhouette Cameo Temporary Tattoo paper and just modified my initial logo design adding in a background color and making sure to flip it so when applied the text was in the right place.


I scaled the size down just a bit keeping small kids in mind and was able to get 12 on one of the sheets of paper provided. I printed these on my home printer and then cut them out on my Silhouette Cameo. I brought along a bottle of rubbing alcohol to clean the kids skin hoping it would make them last a bit longer. The kids loved them and all the moms ending up tatting up too. It was super cute and lots of fun but next time I would make sure to wait to apply them to the kids skin after they were done swimming for the day. They definitely faded and fell off but in a normal situation would last a solid day had water and swimming not been involved.


My last bit of fun and branding was to make a flag for our campsite. I decided to work with our local Fast Signs shop where I live and decided on a two foot by two foot square flag. I sent them the same logo and we picked a background color for the flag and they did a direct print onto the canvas. They added the three grommets for me and my husband built the stand for me out of PVC pipe that he spray painted and we attached the flag with some zip ties. At the campsite he secured into the ground with a piece of rebar that he hammered in. The flag was at our site the whole trip and I made sure to get lots of pictures around it of the whole group and each family.


These were all really simple easy and quick things that just added that finishing touch to the trip and made it that much more special for everyone. I will definitely try all of these things again and hope that this inspires you to brand your next group outing.

Note: all links provided are for informational purposes only and no affiliate benefits are coming to me for sharing these vendors with you. All opinions/reviews expressed are my own.

blog signature 012615