Wednesday, July 31, 2013

Project Life 201 - week 30

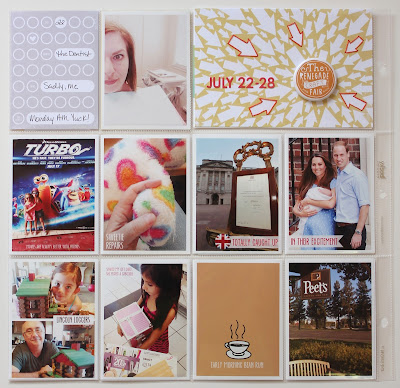
I was surprised at how neutral the palette ending up being this week, its not a norm for me for sure, but it all ended up working and I guess helped tie my insert which is super neutral in to the whole mix.


It ended up being a lot of photos this week and not very many insert cards. Its always fun to see if there is something in my stash of cards that works with the colors and the sentiment. Sometimes you get super lucky.  This is not the original title card that I made but it just wasn't working so I redid it at the last minute. If anyone can tell me where its from I'd be so grateful. I just spent the last 45 minutes trying to figure it out and I'm at a complete loss.  I know it came in a kit but its not matching up to any kit pictures and its driving me crazy!  The rest of the photos are just bits of stuff that happened and I like the little out of the ordinary things I remembered to take a pictures of this week.


For the unknown title card I decided to embroider around a few of the arrows just to highlight and point at the super awesome flair I picked up at the craft fair on Sunday, the alphas matched the embroidery floss just enough to tie all the orange in. Totally love it.


On the right side, more bits from the week, I love the photo of the store window, you can just make out our reflections on the left side of it. And the sky at night photo, reminded me so much of a famous painting I had to include it.


The best part of the weekend was our trek into San Francisco for the Renegade Craft Fair. It took way longer than it should have to get there, so much traffic but we had a blast once we got there. The first card was purchased at the show and handmade of course, love that. I took my cues from it when I made the other pieces and used kraft for the background for the two cards with the text. We had a blast in the photo booth and the one shot flips out to show two others that still make me laugh when I look at them.


If you ever have a chance to attend one of these shows I highly recommend it. What a fun day.

Oh and if you haven't yet don't forget to sign up for the Toolbox class over at Studio Calico, today is the last day to sign up.

Have a great rest of the week!
post signature

Wednesday, July 24, 2013

Project Life 2013 - week 29

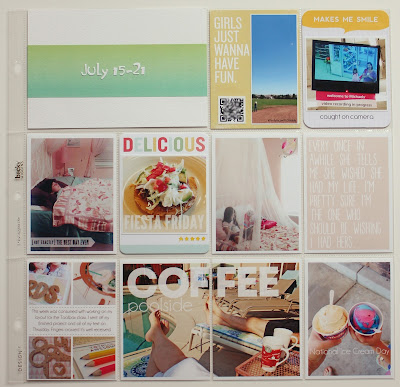
This past week was such a blur and quite honestly I was surprised I had more than enough photos to work with. I felt like I worked a good portion of the week on my spread for the Toolbox class so when I sat down to work on this weeks spread I was so happy to see that I had a ton of fun stuff to work with.


Because I was so focused on what I was doing I guess subconsciously I focused my lens on the girl this past week. She's pretty much the focus and there was a lot of good stuff to pick from. A fun play date on Monday, checking off an item from her bucket list (picnic in the park), seeing her name on the list with the rest of her Kindergarten classmates and lots of fun outside.

 
The title card as always came last and this washi tape just seemed to echo the colors in the lake photos from the left side so it was an easy decision. I adore the tiny white little letters that came in this months Studio Calico Scrapbook kit, I just love the wonky inconsistent shapes.  This card (from the sold out Taylor add on set) was perfect for a kite flying expedition to the park with Daddy and the video he shot is super cute. She and I on a mad dash for a new cameo blade and mat prompted the next picture, a completely random sick day for the girl (I blame the over packed jumpy house), Fiesta Friday!, a photo and some words that I wanted to remember, a little collage about me being super busy on that last spread, coffee poolside for us which was lovely, and National Ice Cream day to round out the week.
 

I hope you have a great rest of the week!

Monday, July 22, 2013

Gatsby, scrapbooked

So I know I pretty much covered my love of this movie in my Project Life pages but when I was heading to a crop last week I needed some stuff to work on and I kind of wanted to document it in a layout. 

I'm also fairly obsessed with one song in particular from the soundtrack so I decided to pay homage to both at the same time.


The base of the layout is this super cool platinum paper that I found in the specialty section at Hobby Lobby.  It's from The Paper Studio and the color is listed as crinkle cream but its way more metallic in person than cream. I cut the lyrics from the song on 36# white vellum, the font I used was Betty Noir. The cream and gold paper is from Anna Griffin and came in this Studio Calico kit. The lettered and numbered tag and the taupe and cream card on the bottom both came from this Basic Grey Hello die cut pack and the Telegram card came from this Basic Gray Hello pack.  The flower bobby pin is from Maggie Holmes and the pink glitter alpha is from Dear Lizzy.
 

I knew I wanted to type something movie related on the telegram when I got home so I did a bit of research on telegrams from the 1920's and found a cool font to use, its called simply Telegram.  I used a line from the book/movie since the song is from the Daisy perspective I made the telegram from Daisy to Jay.  I scanned the little card and opened it in Photoshop Elements.  I laid my text right on top and then printed it out on a piece of cardstock.  I lined up the original and reprinted just the text and it was perfect.

I had already use my ticket from when I saw the movie in 3D in my Project Life or I would have clipped it as well, but its nice to have the ticket from opening day to show the date and where I saw the film.

If you haven't seen it yet and your a fan of the book I really suggest you see it, I think you'll enjoy it.

Have a great week!

Friday, July 19, 2013

Studio Calico Toolbox Blog Hop

As you know I'm excited to be contributing to Studio Calico's upcoming TOOLBOX class. This class will fill your crafting toolbox with cool tips on stitching, mixed media, misting and digital from four technique masters. Amy Tan, Celine Navarro, Geralyn Sy and Shanna Noel will each spend a week in August teaching you the ins and outs of their favorite techniques. I'll be contributing to the digital week, and I'm going to be sharing a Project Life spread showcasing how to use digital elements to create unique journaling cards and elements.  Here are two more sneaks that I've posted of my project;


Through 7.24, Studio Calico has a cool offer for everyone who signs up for Toolbox - they'll be able to pass a FREE spot in the class to a friend. Here are all the details


You should also check out these other digital week contributors, they just might have some sneaks to share with you.

Catherine Davis
Stephanie Washburn
Tina Azmus
Emily Branch

When your done there you'll want to stop by Shanna Noel's blog for a chance to win a spot in the class, and then pop over to the Studio Calico blog for more links to class sneaks and giveaways!
Good luck and I'll see you in the classroom!

Wednesday, July 17, 2013

Project Life 2013 - week 28

Well my week 28 layout is just about done. It's taking me a bit longer to put this one together because its the layout I'm submitting for the August Studio Calico Toolbox class.  I won't be showing you the layout here or anywhere but the classroom so I do hope you sign up for the class if you haven't already. The early sneaks are looking amazing and you can see them on Instagram and Twitter under the hash tag #SCtoolbox

Here is one that I posted yesterday

 
You can sign up for the class by clicking here.  Registration closes on July 31st and the classroom opens on August 5th.


I hope I see you there!

Friday, July 12, 2013

Shaker pocket tutorial

When I was trying to decide what to do for my title card for the week of July 4th I knew I wanted to use sequins so when I was playing around trying to decide what to do I ended up with a sequin shaker pocket idea. I then spent a good amount of time trying to figure out the best way to do it.


First I designed the text portion of the card in Photoshop Elements. I wanted to make sure the cut file would fit on the card and allow enough room around the edges for my text. I printed the text on the woodgrain cardstock and then cut the USA from it on my Cameo. The cut I used was a trace of my USA map outline that I shared awhile back but there are several USA outlines in the Silhouette store or .jpg's can be found online that you could trace.


Then I cut a piece of vellum to 4 x 6 and also cut up a standard 8.5 x 11 sheet protector down to 4 x 6 as well.  The plastic protector will be the top and the vellum will be the bottom. You could easily use plastic for both parts but I didn't want my pocket completely transparent.

Make sure to look closely at your plastic protector when cutting, try to use a piece that isn't scratched or marked up. I had to fish thru my stash to find one in good shape.


I used some washi tape to hold these two pieces together so they wouldn't move around while I sewed them together. Make sure you use a washi that isn't too sticky so it won't tear the vellum when you remove it later. 

Note: Be careful when handling and filling your vellum and plastic pocket, the plastic can scratch easily and the vellum will crease if bent.


You could very easily just stitch around the perimeter of your plastic and vellum and fill it with your sequins but I wanted to make sure that my sequins stayed within the cut out portion of the USA.

I layed the positive piece down and matched the edges so I knew the correct placement of the cut out. I then added some tape to the back of the negative cut so I could stick it down on top of the plastic.


Basically you want to put the puzzle pieces back together exactly on top of your plastic and vellum.


Remove the outer frame and your left with the exact placement of the cut out.


Carefully stitch around the edge of your USA cut getting as close as you can, make sure to leave a portion open so you can fill it.


Play around with quantity and variety of your sequins. You'll notice some of the smaller fit into the Florida and upper east coast areas nicely. You don't want to pack it too tight or the sequins won't move around.


I layed my piece back on just to make sure I stitched up the opening in the right spot.


When done sewing, trim your threads and remove all the washi tape from your edges and completely cover the mask with adhesive. I made sure to especially cover the edges really well of the cut out so it would sit down tight on my plastic.


When you lay your mask on top you get a shaker pocket perfectly sized to your cut file.

 
Here is a look at the backside of mine. 
 

This could be done with any shape for any occasion. I hope you give it a try. If you do please make sure you link me back so I can see it.

Wednesday, July 10, 2013

Project Life 2013 - week 27

Three cheers for the Red, White and Blue!

I hope you all had a lovely 4th of July! Ours was super hot and super quiet which was just fine.


I dedicated the entire left side to July 4th. I found those super cute Statue of Liberty crowns on a friend's Instagram feed and knew it would make for a fun photo so I hit up Target's dollar section and grabbed a few. Even though it was just us we still put out the decorations around the pool. That night we set off some fireworks out front and Simone was still pretty freaked out but in the end managed to enjoy a few sparklers.


The 4 card in the middle was one of my favorites from the Roundabout Project Life kits and I really wanted to use it but there wasn't a horizontal version on the backside like they do sometimes so I had to improvise to make it work. I slipped a piece of white woodgrain paper in the two center slots and adhered my flip up to the outside of the protectors. I was able to add my journaling and another cut file inside. I thought for a moment of doing another sequin pocket but decided in the end to leave it plain.


The right side had to hold the rest of the weeks photos so lots and lots of editing out. The title card you'll see below, the announcement of the new class at Studio Calico, a super hot welcome to July, buying the fireworks, napping in the heat, some summer fun in the morning, a new hot tub that I think she loves even more than Daddy, we saw this and loved it, our summer bucket list and checking a major one off.


I knew I wanted to use red, white and blue sequins for my title card and after much playing around and head scratching I ended up here. Its a shaker pocket and I LOVE it. I'll have a full post of instructions up on Friday if you want to make one yourself.


I also added another flip up on this side for the Minion slot. Simone and I took a spin at the photo booth after the movie and the pics came out so cute. We went to the first show on Saturday and thankfully I purchased my tickets in advance, we got the last two seats together and it was completely sold out. We loved it!


I hope you have a great rest of the week! See you back on Friday!
Monday, July 8, 2013

Is that an actual layout?!

It's been ages since I shared anything other than Project Life so when an actual layout was done I felt I needed to share it.

Just the other day I sat down with my list of layouts that have not been done and decided just to torture myself I updated my list to see just how truly behind I am. Well, it wasn't pretty, like 70 layouts in the family book and that was just up to the end of 2012 and 54 for Simone's book also thru the end of 2012.  Needless to say I went thru that list with a red pen and scratched off all the "I'm pretty sure you covered that well enough in Project Life" as best I could. It's still not pretty and I know I still need to edit out more.  Staring down my super daunting list I realized I have a few options, 1) throw the list away and pretend I never made it and these events never happened or 2) do them quick and dirty style, digitally or 3) continue to edit down the unnecessary and get busy making some pages.  I have a feeling I will end up doing a combination of 2 and 3, I just don't have the heart to do number 1.

The good thing is actually making this one has helped motivate me to get some of this work done.

The layout was started at the watercolor class I took at the end of June in Berkeley. I showed some bits of this in my week 26 Project Life spread but not the finished piece.  I used my Peerless Watercolor papers and only used Myrtle Green and Olive Green for the background. Its really amazing the color variations you can get from watercolors, especially these watercolors.  The red painted parts are Scarlet Lake.  There is also a tiny bit of this gold on top of the red strip at the top. These paints are amazing and I also bought this color and wow, the pigmentation is fantastic.

Initially I loved the watercolor background up to the point of me adding the red parts.  I did another background at home and while I liked it, I liked the first more so I ended up using it and just embracing the parts I didn't like and made it work.


For the title I printed out the text on a piece of vellum and then did an offset cut and had my Cameo cut it out. It worked pretty well once I figured out my blade settings to really get a clean cut all the way through (my blade was set on 3). I added a few splatters of Heidi Swapp's Color Shine, I used Gold Lamé and Sweet Cherry and called it done.


I'll let you know how I do on the list whittling and getting somewhat caught up.  I am headed to a crop in a few weeks so my plan is to actually get some paper layouts done.

Have a great week!

Friday, July 5, 2013

How to use QR codes in your Project Life pages

One thing that I love to do in my project life pages is add little video's using QR codes. It's a fun way to tell more of a story other than just a static photo and words. I've done it quite a few times and every time I show it on Instagram I get asked how its done so here is a quick tutorial of my process. I'm sure there are tons of other ways to do it but this is what I have found to be the quickest for me.

Since I tend to shoot all my videos on my phone it makes the process that much easier to do. If I decide to use a video I took in my pages I just head to my camera roll and within minutes I have a QR code ready to go.

1. find your video on your camera roll, in the bottom left corner you'll see a little arrow button, select that.


2. It will bring up a menu, select YouTube


3. If you don't have a YouTube account, you'll need to create one. Once that's done and you've logged in you'll see this screen. Here is where you want to name your video, just so you can find it later.


As you scroll down thru the initial upload screen you'll see the area where you'll select the privacy for your video. The default for your video's privacy is always set at Public. If you have no issues with that by all means leave it alone but if your like me and don't want randoms looking at your videos then by all means change it. There are two options, Unlisted allows others to watch if they have been given the URL, Private can only be viewed by the account holder.


4. I tend to always change mine to private, again personal preference. This however will mean that the only way to view this video with a QR code reader is with the device of the account holder, meaning from my phone only. This may seem excessive but in case I ever have my album on display when I'm not there to monitor who's looking at it, they won't be able to click on my videos.

When you're done selecting your privacy you'll want to hit Publish in the upper right hand corner.


5. Once the video is uploaded you'll want to head over to YouTube and log in to your account. In the upper right hand corner you'll see your account name, using the pull down you'll want to select Video Manager.


6. There you will see a list of all of your videos you have uploaded.


7. Select the video you want and find the share button.


8. Click on share and you'll see the URL area populate. Right click and say copy. 


9. Open another window and go to this website to generate the QR code.  In the very first box select the pull down and choose URL. 


10. Delete everything showing in the URL slot and paste in what you copied from YouTube and then select the Generate button.

Note: I typically leave the Barcode size as Large because I like to have the largest possible one to then modify as needed in Photoshop Elements. When you select Large size barcode you will get a code that is 5 inches square, Medium generates a 3.25 inch square and Small generates one a bit smaller than 1.75 inches square.


11. Once you hit generate, over on the right hand side you will see your QR code. I then hover over the code, right click my mouse and hit "Save Picture As" and save it to my desktop.

 
12. The file type will be generated as a .png file but you can open the file and print it or drag into Photoshop Elements to create your own insert card.
 

Here is an example of one that I made most recently of my first Instagram video.


 I hope this tutorial helps, if you have any questions please let me know.