Wednesday, November 27, 2013

Project Life 2013 - week 47

I ended up using a lot of cards from the recent Cuppa Project Life kit from Studio Calico. The cards just all seemed to work in the spots I needed to fill and I always love when that happens.  I find that with the protectors I'm using Design D and F I need to make the cards work for me like I did with the numbered cards.


We celebrated Larry's birthday this past week, my mother in law looking ubber stylish on an outing, my sweet girl being sweet which is super awesome.


The calendar date card was in the kit and I really wanted to make sure it got used before the month ran out. I added a little bit of red stitching to tie it in to the few pops of red on the layout.  The holiday music has started but I'm trying to take it slow until after Thanksgiving.  A little holiday cheer for my phone wallpaper, a picture of my DD cover, a lunch date with my friends and their kids, some stuff about me underneath the woodgrain card that I loved. Me in camo, never thought that would happen, like ever.  Some photos of my girl playing indoor soccer courtesy of my super talented friend. Our holiday DIY projects and our first Christmas movie of the season. Let me tell you how happy I was that Simone watched this. She's always been afraid of him but I coaxed her thru the beginning and she ended up loving it, yay!


Here is a close-up of the stitching on the title card, super simple back stitches but I do love the pop of red on the grey.


I hope you all have a really lovely Thanksgiving and if you're hitting the stores late or early please be safe.  I'll be attending Black Friday via my comfy sofa while under a blanket.
post signature

Monday, November 25, 2013

Holiday Decor projects

Last Christmas I had all kinds of ideas for fun things to make and many of them never happened so this year I started early to make sure at least some of them happened.

A few months back I found a super cute idea on Pinterest to make your own mini marquee lights from paper and really wanted to do it until I found this while browsing Target.com recently.

 
They are large (12" high) metal letters with lights and are ready to hang if you so desire.  They also have Believe and Noel. I would have loved to get the Believe since that was the word I had in mind for the paper version but because these are large I didn't have enough room on my mantle to put it with the other items I have planned. 
 
I happily found it in stock at my store despite their online stock checker saying it was out of stock.
 
 
At only $19.99 I thought it was a bargain since I didn't have to make and assemble it myself.  It comes with a super cute woodgrain look but I was hoping for something a bit more shiny.
 
We removed all of the outer clear bulb covers and left the lights in place, we didn't think the plugs for the lights would come out easily enough so we opted to leave them in.  We just wrapped painters tape around each snug up to the metal base and pinched it closed at the top. I also removed the metal rings at the top of the letters with a pair of pliers. I knew I wasn't hanging mine so carefully and with a bit of force and wiggling they came off no problem.
 
 
As far as the paint choices, here is what we used;


The Metalcast primer my husband had on hand for another project but it ended up being a really great primer for both of the projects we did.  The white Ultra Cover was okay, it cracked and came out of the can a bit yucky but it could have just been our bad can.  It didn't matter too much in the end since we covered it up with the glitter spray which hid everything well.  The top coat was just to seal the glitter in so it doesn't go everywhere.  He ended up doing two coats of the primer, three thin coats of the white, several coats of the glitter until it looked the way I wanted it too and one coat of the sealer.

Here's how it looks all done and lit up, the white is pretty much covered but it definitely helped to cover the brown up first before applying the glitter. You could probably skip the paint step and just go with a white metal primer instead.


Because the won't stand on their own, especially the J and the O my husband took a piece of wood he had on hand and cut a little angled channel in the top and the letters sit down in that just great on their own.  He's painting it white for me to blend in with our mantle and as soon as it's dry I'll add a photo of it.

For my second project, I had found this super cool paper mache deer head at my local JoAnn's a month or so ago when I was there for something else.  It's labeled Craft Essentials item 1279-7577 and it's a nice size about 16" from the bottom to the top of the antlers.  It was $14.99 and with all the other seasonal Christmas crafts at the front of the store.


I thought this would be great painted gold so this is what we used;


The same Metcalcast primer and this Gold Foil paint.  He did two coats of the primer and two coats of the foil paint and this is how it turned out.


It's like it was dipped in gold and I love it!  I'm not sure how this paint will work on its own but in combination with the primer it was amazing!  We decided not to seal it so it wouldn't dull the look of the piece.
 
I look forward to adding both of these items to my Christmas décor that will go up in the next few days.

post signature

Friday, November 22, 2013

December Daily 2013 - the cover

Oh its beginning to look a lot like...... I won't say it but you know it's coming.

I finally carved out a few moments on Wednesday to work on my December Daily cover and happily this one took less than 10 minutes (not including drying time). A first for me and a purposeful one at that.  I loved the album that came with my Studio Calico December Daily kit but I just didn't want to have to paint my album again this year especially since my last two were painted.  Plus I kind of had my heart set on a solid color this year and I wasn't sure I would be able to match the red spine well enough that it wouldn't bug me. 

Enter in the new Studio Calico handbook line and bam, hello red!  I ordered that baby up in no time flat.  I had purchased a super cute wood veneer ornament from Michaels and thought it would be great on the cover.  I thought about embossing the whole thing either in gold or taking the time to use green on the holly, red on the berries and gold on the deer but that seemed like it would take forever and had the risk of not turning out the way I had hoped.  When I laid it on the album cover to make my decision I loved how the blond wood looked against the red background.  I dug thru my stash and found some ancient red rhinestones and thought the addition of that little bit of red dimension was perfect.  The gold twenty-thirteen flag was in the kit and I knew that was going on the cover and it just rounded the whole thing out perfectly.


The rhinestones were sticky backed but I opted to use some of this glue just to make sure they didn't pop off and attached the whole veneer piece and the gold flag to the outside of the album with some red line tape so I'm pretty sure it's not going anywhere.


As far as the inside goes, I have some ideas in my head of the direction and feel I want the album to have which is based a lot on what came in the kit.  I do need to go thru my supplies and see what else I might want to add to it and need to do that fairly soon. Other than that I don't think I'll pre-do any pages like I have in the past.  Again, the free and easy approach is a place I'm hoping to stay in this year.
 
I'm looking forward to this so very much, its the highlight of the season for me and I can't wait to add a 5th album to my collection.


post signature

Wednesday, November 20, 2013

Project Life 2013 - weeks 45 and 46

I love traveling but I hate being behind and since I was you're getting two weeks for the price of one. I apologize in advance for all the photos and for the less than stellar photos too. My camera is in the shop getting tuned and repaired.  Remember that lens issue I thought I was having, well I was.  It's a mess.  Hoping to get it all back and brand new like before Thanksgiving.

I'll keep the commentary to a minimum so here are the spreads...


It was a big week, of course the tooth falls out the night before I'm leaving on a trip and I was not ready, par for the course I suppose but we pulled out a win in the end.  A super big day for my brother, love him so much and so proud to share his special days with him.


Some snaps from the trip and our return flight was epic, it will be hard to beat. We started our trip to Disneyland at the end of this week so just a bit of it here.


I missed a game while I was gone and of course she scored two goals.  Why she waits for one of us to be gone to score I don't know, maybe she feels less pressure, who knows.  These pics were snapped by my friend at an indoor clinic the girls are doing and I love them so it was nice to have something to include for the week.


Here is Week 46, I managed to get 45 pictures into the main spread (not counting the insert) which I think is a new personal best for me.


Since the main part of our trip was the four days it worked great to use the right side for each day.  One slot of journaling and one large 4x6 that flips out for each days photos.  The left side were photos from the trip that I wanted to highlight in case someone doesn't want to look at all the flip ups, in essence some of my faves.


The little epoxy days of the week banners that came in the recent Studio Calico Cuppa Project Life Kit were perfect for my journaling cards.  I made the little paper pieces to fit underneath mimicking the cut of the epoxy pieces and just attached them to my printed journaling with a tiny attacher.


Here are two of the cards flipped out so you can see.  I just made 4x6 collages and attached them to the cardstock fold out piece.  If you want info on how I do the flip outs, you can see my tutorial here. It's the same technique just a different size.


I made some changes to the main spread after I posted it to Instagram and moved my one photo from Friday night to the insert because it was related to our end of the season soccer party. Our final game was Saturday morning and it was a win for our team. It was a really great season and we look forward to continuing with this crazy crew as we move indoors.


With all this said I'm happy to be back on track, I have quite a few projects that need to get done before the end of the month, especially December Daily.  You'll be seeing me back in no time with more to share.

Have a great week!
post signature

Wednesday, November 6, 2013

Project Life 2013 - week 44

The main focus this week was Halloween, I ended up using the entire right side for it which means it was a super photo heavy spread.  In fact there was only two cards and the rest were photos.  Thankfully I didn't have an abundance of photos to fill the left side so it made it easy.


Hello fireside cartoons, hello shopping, hello pizza, hello family photos, hello hilariousness from Simone, hello fawn, hello lake and hello gratitude.  The title card was a way to tie in the Halloween photos and our little witch.


And hello one heck of a crazy Halloween day for us. Luckily by nightfall everything had worked itself out and she had a really great night.


Here is the soccer insert for the week, it was a really great game and the girls did a really great job. Simone got to play goalie which she loves and after the game we snapped a shot of the team for the coaches.


Have a great rest of the week!
post signature

Monday, November 4, 2013

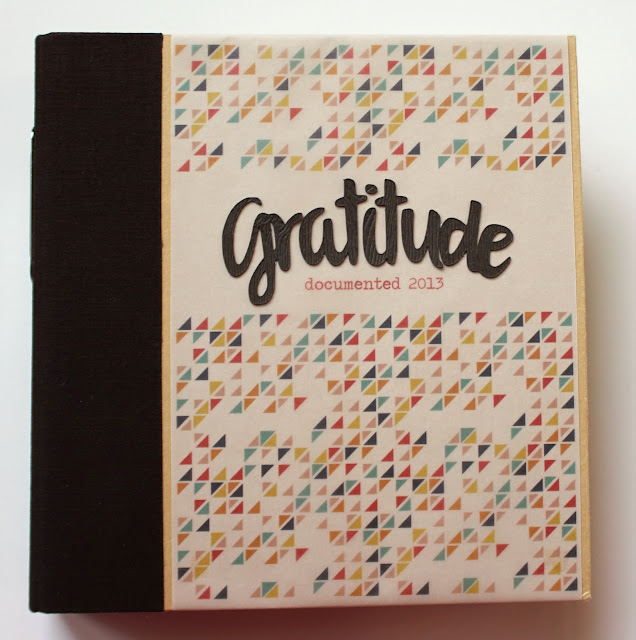
Gratitude Documented

November is the perfect month to focus on all that you are grateful for.  I have always loved seeing peoples posts online and on Instagram in November where they share the things that they are grateful for.  When my friend Shanna Noel asked me to work along side her this month documenting the things that I am grateful for I said yes without hesitation. 

You can see all the posts she has done so far on her blog here which you will definitely want to check out because she is giving you all the files so you can make your own album too.  Like this one below, which has one of my favorite cards that I modified for my album cover.


She has a really great video showing how she pulled together different products that she wanted to use and I did the same thing but just not in video form.  Below is a snap shot of some of the things I pulled from my stash, I went quickly and just grabbed what felt fallish and what would go with the color scheme of the printables.  I'm sure that more will be added but this was a really great start.  Clearly I'm in the mood to use a lot of wood pieces, you just can't beat the texture.

I decided to use a brown Simple Stories album that I grabbed on clearance at my local Hobby Lobby. It came with protectors and some cute chipboard dividers and a few insert sheets.  If you want to see what came with it you can see it here.  If you have specific questions on products please ask but most of it is from my Studio Calico kits and from Freckled Fawn. 


For my cover I spent some time deciding if I wanted to cover it, paint it or leave it just the way it was. I new it needed some sort of adornment so the first thing I did was modify one of the cool stamp brushes Shanna included with the downloads and cut it from some woodgrain cardstock I had on hand.  I also modified that one card I mentioned above for a background that I printed on vellum. It wraps around the Kraft cover and is adhered to the inside of the cover.  I left a space in the middle for the cut file and added the rest of the album title which is part of the vellum overlay.  I really love how it turned out, the graphic is just so cool.


Here you can see the texture of the woodgrain paper a bit better and the triangles up close.


I also made a title card using another image from one of the cards and some text.  I added a few enamel dots that matched the colors perfectly and a little gold glitter arrow on top of the protector.


My plan is to sit down and really think about the things I am grateful for in my life and plan out some pages. I will have more to share the later part of this month once I have some content completed.

I do hope you check out Shanna's posts, she did such an amazing job on this and I sure hope you join us.

post signature