Its only seven months late but I finally finished my Road Trip Mini Album from the big trip we took this past March. I have no idea why this project took me so long, well that might not be entirely true, I think the pressure of such a large task might have had something to do with it. But either way I'm so happy its done.
This will be photo heave so I apologize in advance, but here we go.... I'll try to call out supplies for the things I remember if you have specific questions, just let me know.
First up is the actual Album, I used an Aqua Studio Calico Handbook for this project, I just loved the color and I've used plenty of handbooks in the past so I knew it would hold all that I needed it to hold. I used a lot of Amy Tangerine's Plus One line throughout, both the physical and the digital versions. The globe sticker here is from that line, the white Alpha was from an old Studio Calico Project Life® kit.
Here is the finished album, it was a perfect fit.
The very first page of the album was done before I even left on the trip. I don't think I've ever shared it here but it was a total labor of love. I created the design in Photoshop Elements and printed it out in a very light grey right on my piece of cardstock and then I hand stitched the whole thing. I used a DMC variegated embroidery floss in color 4040 which was the perfect match for the album cover. As I recall it took me about 4 hours to complete but it was totally worth it.

After that I pretty much worked by location, grouping everything together so that it was easy to move from place to place. I needed a beginning so this was it, a very simple first page and then us heading out. I decided to keep my journaling to a minimum for the project because I was going to type up all of my trip notes and include them in the back. Because of that I decided to make up little 3x4 cards with the basic details of the day and our depart and arrival times if it was a travel day. I love how they look throughout the album and I used the digital day of the week art from Amy Tangerines Plus One collection. The 'And So the Adventure Begins' letterpress card is from Kelly Purkey. The supplies on the left page are all Amy Tangerine Plus One.
>> Yosemite
If you ever want to stay over near Yosemite, The Evergreen Lodge is amazing. This was our second time there and it won't be the last. Its picture perfect and just lovely. And I'm not getting any kick back for saying that!
I added in lots of small size items in the album, I just really like have things be different sizes, so here I just printed two 4x6 photos stuck them back to back and cut a few attachers from the
Studio Calico mini attachers die and it was super easy.
I also loved using the small 4x4 We R Memory Keepers page protectors. I used them a few times and most often than not something was just stuck to the outside and left blank and clear surrounding it so you could see thru them.
On this trip we made a real effort to gather National Park Stamps when we passed thru a park, I bought a passport book for myself and a junior version of the passport book for my daughter and we had a great time collecting the stamps. I wasn't sure how I was going to use them but in the end I scanned the stamped images and deleted the background to create a transparent .png image that I could lay on top of my photos and recolor if needed. This is the first of a few you will see throughout the album.
I made my journaling card for the day the same shape as the sticker that was on the front so it wouldn't hang over the edge. I also scanned the little badge I purchased so get the size and then removed that portion from my photo grid so it would have a little place to sit on top of the photo.
I used a Studio Calico 6x8 handbook protector and just cut off the portion I didn't need since my photo grids were 6x6.
>> Las Vegas
I didn't love this stop, we got a super cheap room on Groupon at this hotel and it ended up being in the motor lodge which we knew in advance, I just wasn't expecting it to be quite so seedy. Thankfully it was just one night and it was clean and relatively safe. The girl had a blast in the arcade though, which made up for the not so good parts. Had to LOL at that 'rather forget this' sticker from Amy Tangerine, it was the perfect fit for this section.
We did stop for the Dam Tour....it was cool but the line was super long and it was super hot so it was kind of just okay. I opted to purchased the green screen photo which is the one on the left below. It was 6x8 so it was kind of a no brainer. The chipboard frames are from Crate and I used two back to back to hold some photos, I just stapled two of the attachers from Basic Grey to add it to my rings.
I grabbed as many brochures as was allowed on the trip and tried to add all of them in the album. I love this kind of stuff because it always changes over time and it will be cool to have and look at years from now.
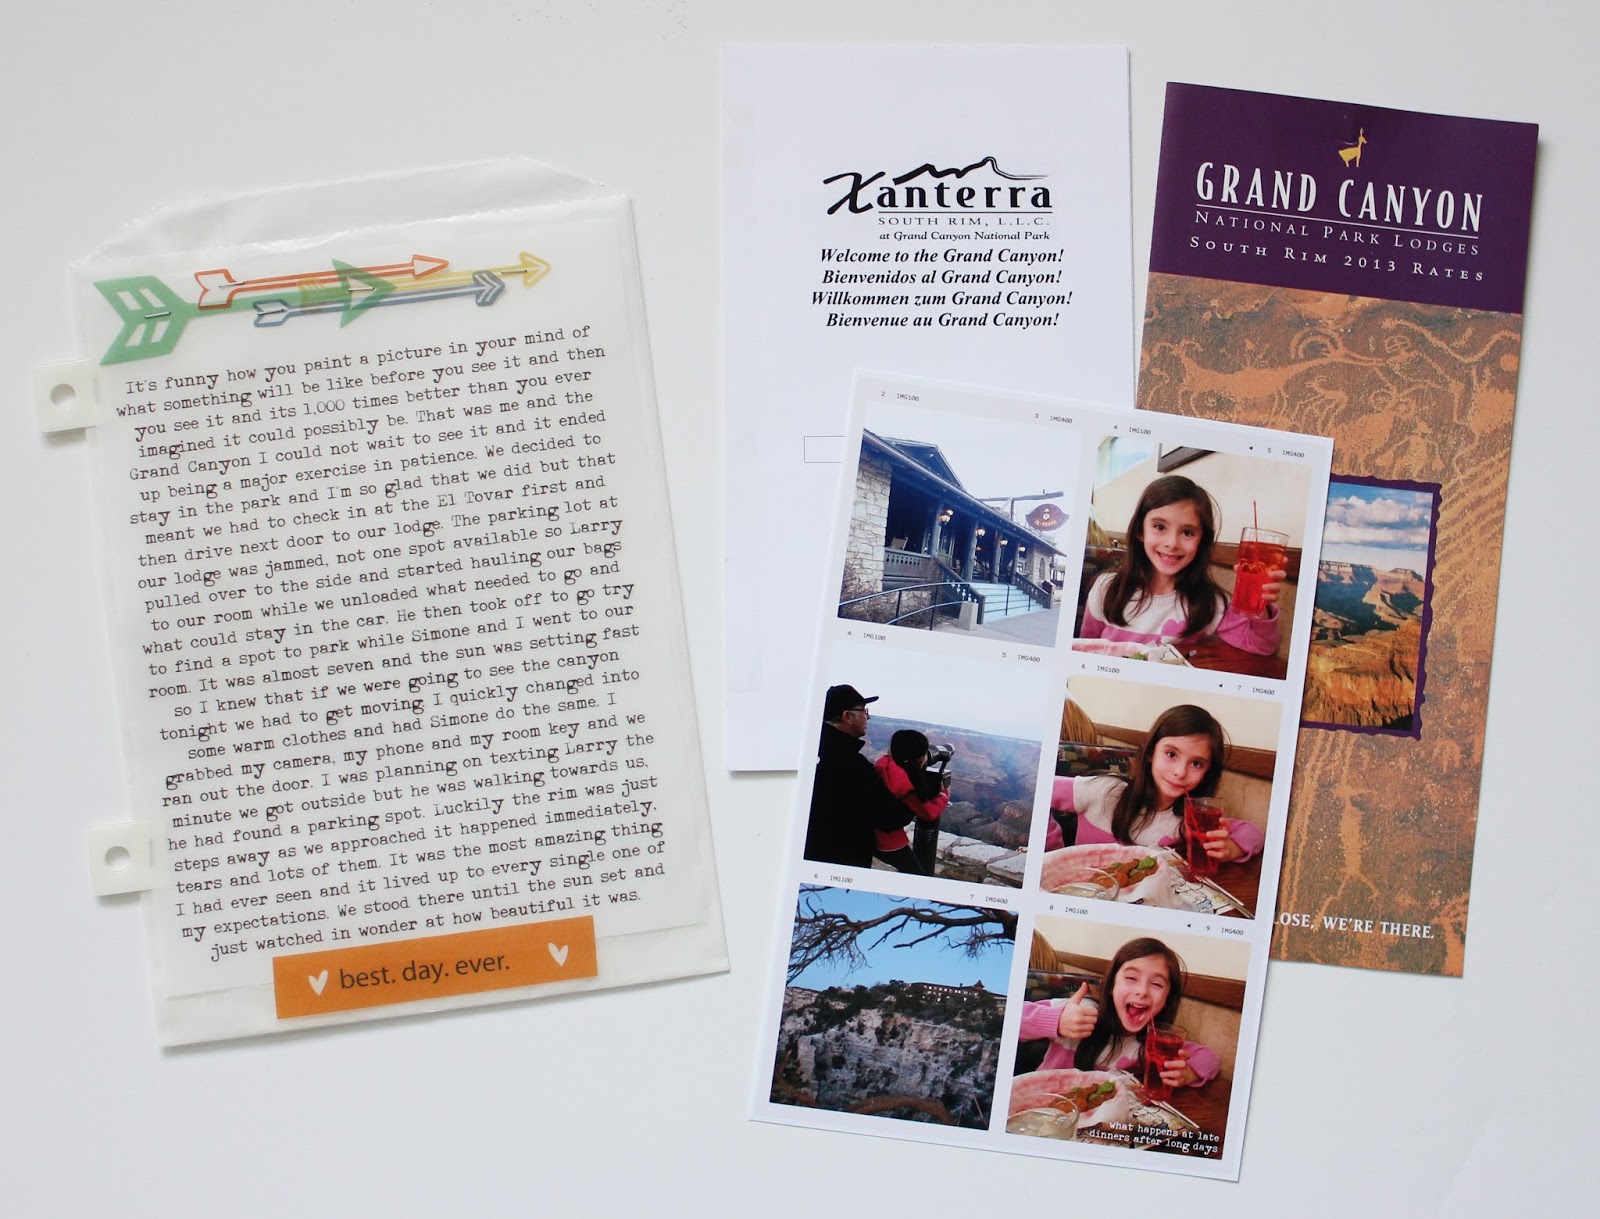
>> The Grand Canyon
So this part was probably the longest section in the album and rightfully so. I used tons of large 6x8 photos and I really love them.
This is a large glassine envelope that I initially tried to print my journaling directly on but it wasn't having it so I ended up printing it on a piece of vellum and attaching it to the outside using a bit of vellum adhesive and my tiny attacher which I used to adhere the vellum arrows from Studio Calico's Atlantic release. I slipped in some info about our hotel and a few more photos from that first day.
Here's another of the National Park Stamps on the left, for the most part I just wanted to leave all my photos plain and sometimes that's totally okay. The journaling card for this day needed some more space so I made it open like a book and also slipped a photo in behind it.
Man I would have paid money to see that sign in person, oh well. I wanted to call attention to the viewing areas we did stop at so I just printed up some simple vellum flags with the bus stop names and stapled it to one of my photos of the canyon, a quick and easy way to document that part of the tour.
Another brochure, you can't really tell here but I did take care to attached the plastic attachers in a way that allowed the maps to still open for anyone that wanted to see the whole thing.
This was one of my favorite photos of the day, my husband loves it too. He wasn't expecting me to take a picture but he was glad that I snapped it before I had my heart attack.
I wanted to talk a bit about my fears while we were at the Canyon but I didn't want to dwell on it so I decided to make a little vellum tag with a little text to make that point clear. I created the text and printed it out and cut it into two tag shapes and stitched them together, filled it with a random bit of sequins and sewed it all shut. Its one of my favorite things in the album.
I absconded every hotel room key that I could and I think I got them all but the key from Evergreen Lodge, theirs aren't steal-able, they are real keys that would have been missed. But the credit card ones are perfect to take home and use in your albums. Here I placed two back to back stuck to the outside of the protector. I also tried to take photos of our rooms whenever I could, I didn't use them all but its a fun reminder of what room you stayed in. Oh and the quote on the bottom left photo was carved into the back of the El Tovar Hotel which was steps from where I took this photo.
>> Phoenix
I totally staged that top cactus photo but come on, we don't see them every day. The Yes No is a journaling card from Amy Tangerines Plus One line that I used digitally. I enlarged it to fit over my 5x7 photo.
We were lucky enough to see each of our home town teams play in Phoenix and seeing Spring Cactus League Games is something you should definitely put on your bucket list, it was a lot of fun. Super hot, but fun. The A's played their last season at that field so it was cool to be there for that.
Of course the tickets went in with our parking pass, I wish all sports events had this kind of price for parking. The Yay flair was from an old Studio Calico Project Life® kit and the stars and clips are from the Studio Calico Essentials line.
Made sure to take a screen grab of the results from that game because it was a high scoring game.
A very similar treatment for our day at the Giant's game.
Super Duper flair from a Studio Calico kit I believe.
another brochure
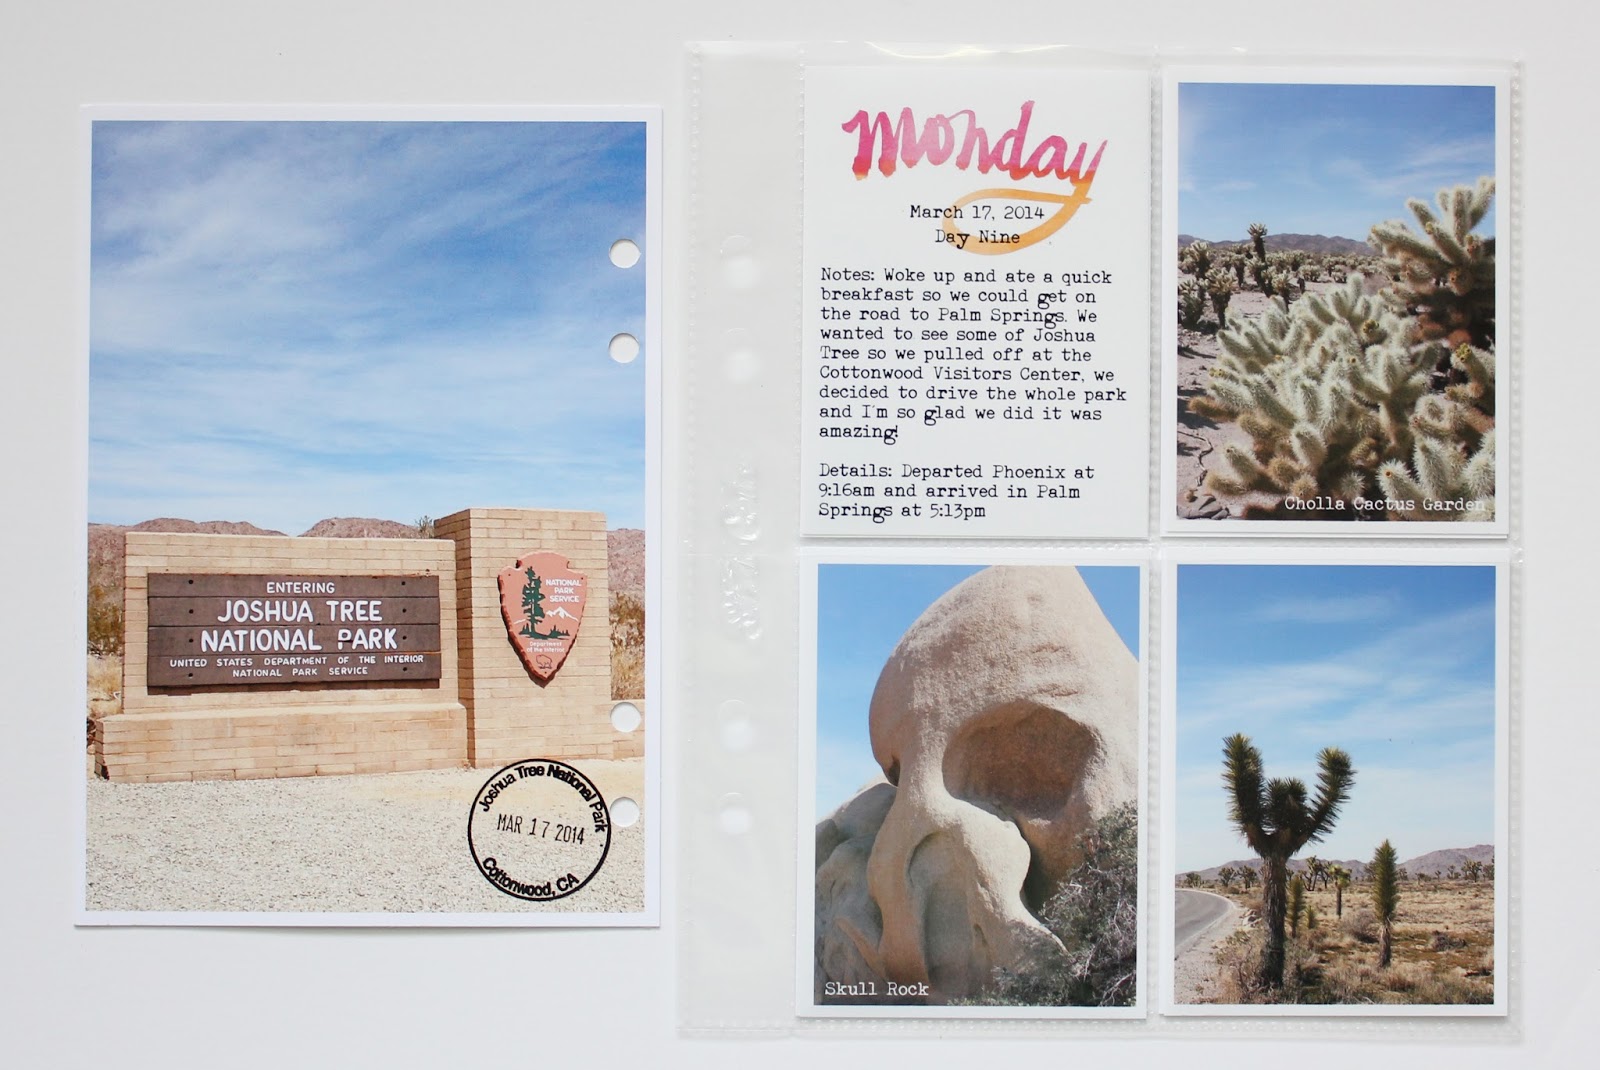
>> Joshua Tree
So this detour on our way to Palm Springs was a last minute decision that I'm so glad we took. We ended up taking the full loop tour thru the park and a kind ranger called out all the good spots we should stop at. It was so amazing! I purposely kept this section super plain because the photos were some of my favorite from the trip and I just loved how they turned out.
When browsing Pinterest for Road Trip ideas and places to stop I saw an image
here that I loved it so much. I vowed that if we went to Joshua Tree I was going to find that tree and take my own photo and I found the tree and took my own photo. Its a slightly different angle but I was thrilled we found it. Thanks to my poor husband who had to slow to 5 mph any time we saw a tree right on the roadside until I could figure out if it was the right one or not. Apologies to any cars behind us that also had to slow to 5 mph.
Another sticker stuck to the outside of a small 4x4 protector.
>> Palm Springs
Oh Ace Hotel, you were so, so cool! I cannot wait to go back one day, maybe even without the kidlet! Another room key cause it was super, super cool. The patch was won by Larry during the Bingo game, its just stapled in in case I ever want to remove it. Our photo by the ACE sign is perfect, I really wish I had the ladies name and address who took it for us, because she deserves my eternal gratitude for such a great shot.
Even the room map was cool. I need to remember to circle or note which one was ours, I forgot to do that.
Hitting up the Bingo Night was a gas, it totally made for the perfect last night.
>> The road home
I added in a few shots we took on our last morning at the Ace (the one of Simone on the bike was from the night before), but it was cute so I just slipped it in here. Our breakfast was super yummy but then it was time to hit the road. I had made Simone this map that outlined each travel days journey so she knew where we were headed and it really help to visually gave her an indication of how far we were going. This was a life saver as far as minimizing the 'are we there yet's' because she could follow along so she always knew how much further we had to go. She really kept a keen eye on the route home, I think she was eager to get back home to her own bed just as much as we were.
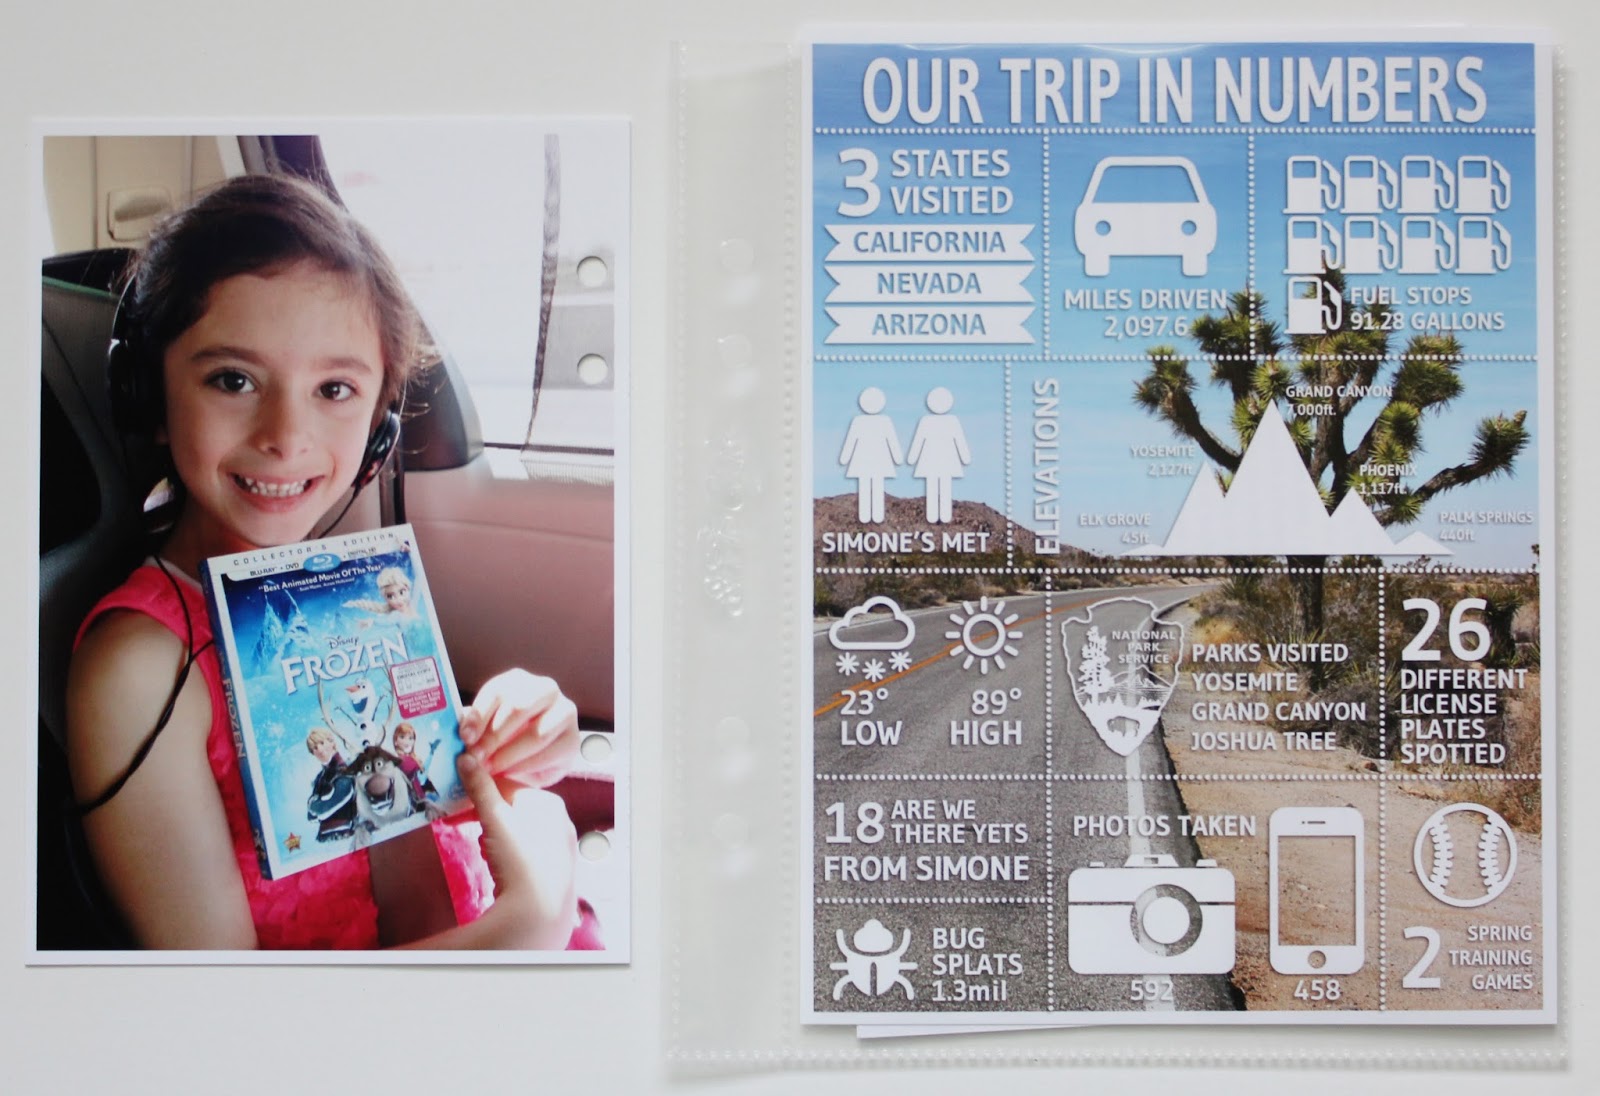
The last page is the Infographic I made, you can read the tutorial
here. I also slipped in behind it my daily notes that I took on the trip that I typed up just so they were easier to read.
I'm so looking forward to another Road Trip adventure and hope we can put one together for next March too. At least now I know how to document it.