Showing posts with label Home. Show all posts

Monday, October 21, 2019

Kelly Purkey Shop Hipster Santa holiday garland

I know its early to be talking about Christmas decor but when I saw the Hipster Santa stamp set from the Kelly Purkey Shop holiday release it became an immediate favorite and I had so many ideas on what I could make with it. When the stamp set arrived and I started playing with it the stamped Santa's seemed to be dancing across the page. I knew I wanted to stamp them and fussy cut them out and make something non traditional with them.

Note: This post contains affiliate links, which means I receive a small commission if you make a purchase using the links below. There is no additional cost to you if you use these links.

I thought they would look super cute strung together on a garland so that's what I decided to make. There are so many fun combinations you can create with the Hipster Santa stamp set so I sat down and wrote out a list of the ones that would work for the garland. I decided to stamp two of each combo so I would have enough to stretch out across our six foot mantle. It didn't take long to fussy cut these out because the Tim Holtz scissor is so sharp and cut paper like a dream. If you don't have these scissors in your supplies, get a pair. I have three different pairs I love them so much.


I knew I wanted them to have some dimension so I also stamped extras so that I could cut out the banners, the coffee cup, the cell phone and the presents. I used foam tape to add the extra piece on top of the base Santa. I love how that little touch of added dimension looks.

I also picked up two bags of red and white tinsel pom poms from Hobby Lobby. Each bag has multiple sizes and I pulled out the large white and the smallest red from the bags to use on the garland. I also purchase thicker thread made for quilting and it was super easy to string them up. I opted to staple the Santa's to the thread but a little piece of washi or regular tape would have worked too.


I couldn't wait to see how this would look hung up so I gathered up some of the holiday stuff I purchased for this year and set up a festive little mantle so I could snap some pictures. How cute are those darn Santa's. The tinsel pom poms really add some fun sparkle and shine.


I think this could also be a super cute alternative to ribbon on your wrapped presents. I can see using some thicker twine to string the Santa's and pom poms and it would be super cute. Or at least have the Santa's dangling from gift tags.


Don't miss out on this stamp set, its my top pick for the season for sure. If you haven't picked up anything from the release or decide to go back for more, you can save 10% on your full order of anything from the shop, (not just holiday kits) with the code OCT10. Its good thru 10/27 so don't wait on that.

This project has me super excited to document our holiday season this year and I cannot wait!!

See you soon,
blog signature 012615

Wednesday, November 4, 2015

Halloween 2015

Halloween was down right busy this year and I have so much to share! Plus I haven't shared this type of post in a really long time and I have actually really missed it. Lets start with the day before Halloween when Simone got busy carving her pumpkin. This year she was determined to do it all by herself and she did. She just needed a little help getting the guts out and cleaning up the cuts at the very end. Her pumpkin came out super cute and its so totally 2015.


Heart eyes all around for this kid and this pumpkin. I love it so much I wish we could save this.

The festivities continued that night with an adult only costume party at our friends house. Larry and I got the ideas for our costumes a few months back it just took a little time for me to find just the right one and and for him to find an authentic traditional outfit on eBay.


Ziggy Zaggy, Ziggy Zaggy, Oi Oi Oi! This ended up being a really fun couples costume and the bonus was I didn't have to wear a wig or alter myself too much.


Of course photo bomb!

The next morning is when things really got busy. Simone had a super early soccer game and then a birthday party to go to and then it was time for Trick or Treating. The great thing was this year she had a friend join us and it was such a blast for the girls.


Simone dressed up as Evie from the Descendants, I think she liked the blue clip in hair extensions the best.


Simone and her friend, two pretty Disney girls.


Larry did such a good job with the webbing again this year, and at the last minute he had me pick up these black spiders to hang up. It was just the right amount of decorations for us. Simple but festive.


Our neighbors however, do an amazing job of decorating and setting the scene at their house, its always amazing and so much fun to see. Darren always dresses up and he scared the beejezus out of the girls, but then gave them a ton of candy so it all worked out. We went back again when it was darker and the projections they have on the front of the house are the coolest thing I have ever seen. Their house was the best in our area for sure.


I couldn't wait to scrapbook the cute girls so I made this quick layout using the Be Scary Halloween Set from Color Cast Designs.  I just loved the black bats and love how they look layered on the black background.


The mirrored Oct 31st piece is just so cool, it really shines and sparkles off the page. The little veneer sayings were just the right touch to add to my little bit of journaling.


I hope you had a great Halloween too! We are already so excited for the holidays that are coming up. I'm sure I'll be back soon sharing more of that too.


blog signature 012615

Friday, March 28, 2014

a little bit of Easter prep

I can't believe its almost time for Easter, now that St. Patrick's Day is over its on to the next holiday countdown as my daughter loves to do.  On Wednesday we got out our little Easter decorations and fancied up the place just a bit.  I don't go over the top just a few bits here and there to mark the season.


Earlier in the week my sweet Instagram friend Jen posted this cute shot of how she decorated here mantle with my little cut file I made a few years back.  You can see more of her super cute decor and her amazing Project Life® pages on her blog here.


It reminded me that while I posted the file on my blog ages ago I had never actually provided a download for it.  So if you are interested you can download the .png files here and the .sil cut files here.


You can see my original post about it here, where I showed how I just dotted on the eyes using a pencil eraser and some brown ink, super easy.

I hope those still under snow get some relief soon.  We have had some amazing weather lately but its raining now as I write this so Spring has not officially hit although its making a really good effort to stick around.


post signature

Monday, February 25, 2013

Family Room ReDo Completed

Well, we finally got everything hung up on the wall in our family room and I love how it all turned out.  Eclectic for sure, but it all seems to work.

Here is a look at the whole wall.  I have one little spot on the upper right side that has room for something else, so I'm on the look out for something to go there.  Six of the 10 items I actually made/crafted myself (with assistance from the hubs) so I'm pretty happy about that. 


Here is a look at the left side closer. 

The chalkboard sign you've already seen, the P was purchased at the craft store, its one of the cardboard letters that they have in different sizes.  I painted it with a base coat of this spray paint with a few layers of this one sprayed randomly on top.  The photo of Simone above it was one I took with my iphone and edited with a few different apps, it's a favorite for sure.  The shadow box was purchased at Home Goods and I filled it with a few souvenirs and do-dads from around the house.  Simone added one too, can you guess which one?  I also left some space so I could set something on top of the shadow box at a later date.


In the center of the wall is our most recent family photo.  I purchased a groupon at the end of last year for two photo canvas' and this was one that I did and I just love the way it turned out.  Above it is another version of the embroidery I did recently in my Project Life album, seen here.  It's done right on a 10x10 canvas that I stained with some random stain we had laying around.  I framed out the top of the canvas with some balsa wood I purchased at the craft store.  It was painted with the same paint I used above on the P for the second coat and I just hot glued it to the top of the frame.


One of the things I wanted to do with this wall was have a place to put some photos and change it out here and there.  I've seen several different types of photo hangers out there but wanted to make one myself.  I purchased this frame at Ikea and we painted the backing piece with the same spray paint I used on the P for the first coat.  My husband drilled a few holes into the interior molding and ran three lengths of copper wire for me.  We reassembled the frame backwards so the glass would be on the back instead of the front so I could have access to change out the pictures.  Super easy project that can easily be done in one day.

Here are some photos of the process;

this is the interior piece that he drilled the holes in for the wire.


Here is a look at the wall from the right hand side.  I purchased the silver gilded tray at Home Goods as well.  I plan to add flowers to it instead of a candle.  The chalkboard tray below you've seen already and the map below it was a last minute edition that I made Saturday evening.


I really wanted to add some sort of map element to the wall and couldn't find anything that wasn't really large.  I had initially laid this out in Photoshop to fit a 12 x 8 frame I had on hand, but in the end I wanted a more hand made look so I decided to try to cut the map out with my Cameo.  There is a map image in the Silhouette store but the states all fit snug together and I wanted just the state outlines.  I ended up having to make this myself and it took quite a few hours to get it right and quite a few starts and stops because things weren't working for me.  After a few not so good attempts I finally got it to cut and lift off the mat in one piece and I was so happy with how it turned out. 
 
I cut it out of textured white cardstock, and picked another piece of gray cardstock as the background.  I didn't want the whole thing stuck tightly to the backing paper so I only put a bit of adhesive randomly, mainly in the areas that had larger sections so it would stick.  One trick I've come up with for adding adhesive to really tiny areas is to lay a piece of waxed paper down and roll my dot roller over my items while they're on top of the waxed paper.  The extra adhesive sticks to the waxed paper but still allows me to lift it off.  I covered three Studio Calico veneer hearts with three coats of Red Glitter Zing embossing powder and placed them on the map to represent where our family lives and ourselves too.  I printed the quote on a piece of vellum and cut the banner shape myself.  Even with the veneer hearts I was able to reassemble the frame with the glass and it closed up just fine.
 

Here are some close ups.


I do believe this is now my most favorite item I've ever made and I'm beyond thrilled with how it turned out.

I had a lot of positive responses on Instagram the other night when I posted it and several asked for the file.  So if you want it, I'm happy to share.  You can download it here.

I did add both Hawaii and Alaska to the file but will say I have not cut these myself and seeing as so many bits of these states are tiny I cannot vouch for it working for you.  However the mainland states will cut but I would advise slowing down your cutting speed, not using super thick paper and taking your time lifting it off your mat.  I did a fair amount of clean up with an exacto knife after I got mine off the mat.

Thanks so much for looking and I hope you love the file.

Monday, February 18, 2013

Chalkboard art made easy

I've been wanting to redo the main focal wall of our family room for some time now and finally decided to tackle it.  I've looked longingly at all the amazing gallery walls on Pinterest long enough!

I wanted to try to make as many things as I could for this new wall and decided I wanted a few chalkboard elements included.  I decided to try two different things to see how it would go.  I have several plain art canvas' laying around and at Christmas time I picked up two faux silver trays at the dollar store.  Armed with a can of Chalkboard spray paint I was ready to go.

The first thing I did was tape off the edges of the two trays I planned to paint.  It's definitely easier to work with the straight sided tray.  The other one I painted was oval and that took quite awhile to tape off because of the curved edges.


The canvas was an inexpensive one from the craft store, it's 16 x 20 and it was pre-primed.  My husband did the first few coats for me and since we had a nice sunny day the coats dried quickly.  I wanted to make sure we had a really nice coat of the paint on each piece so I bet we had at least 8 thin coats on each piece.  The trays each had an embossed design on the center section and after we were done painting these were no longer visible. 


I left them outside to dry for several hours and left them to cure for two days before I added any chalk to them.  Not sure that step was necessary but its what I did and since I wasn't sure what I was going to put on them it gave me a few days to decide.


I have a list of several items I wanted to incorporate into my new wall and one thing that I wanted to make sure to do was make it as personal as I could.  I decided to pay homage to the year we got married on the small rectangular silver tray.

Since I'm not that great at free hand drawing anything I knew if I had something to look at I can usually copy something with fairly good success.  When I was designing what I wanted in Photoshop Elements I realized that if I just cut out what I had designed on my Cameo I could just use it as a stencil.

Here is my design cut and placed and ready to fill in.


I just held it down tight and basically colored in the stencil with chalk.  When it was pretty well covered I removed the paper and did any clean up needed.  I made sure to fill everything in the best I could and cleaned up all the stray bits of chalk dust.  And trust me, there was a lot of it. 


Here is the finished tray, I added the hearts myself because that corner looked a bit bare.  I need to figure out how to seal them since they will be hanging on the wall and will gather dust.  I've heard hair spray works but I'm still researching that. 

* One thing I want to add is I did not season these pieces as you normally would with a newly painted chalkboard piece.  I decided not to do that because I wanted the dark black background vs. the chalky white one you would get on a seasoned board.  This was purely a personal choice but I'm sure the pieces would have stood up to a good rub down with chalk.


For the canvas I decided to first drawn my own frame around the edge.  I used a piece of paper cut a bit smaller than my canvas size and just dragged my chalk along the edge while I made sure to hold it down tight.  It created a nice sharp edge on one side and a softer more irregular edge on the other.


I repeated with a smaller piece of paper to make another frame line and when I was done I added lines in the corners to mimic the mitered edge of a picture frame.


What to put in the frame took some time to decided.  Eventually after much deliberation and approval from my husband I decided on a line from a favorite song.  I used the same technique as the tray to add my text to this piece.  I decided to make the font more graphic since the other was so curvy, I thought it would be a nice contrast to use different styles for each piece since they will hang on the same wall.  Before I started filling in my text I placed a book underneath the canvas that was the same thickness.  It helped to have a nice firm surface to fill in each letter.  I did save all the centers of each letter from my template like the A, D, O, R and B and just laid them down holding carefully while I filled in each letter.  I thought it would be easier to do that than try to remove the chalk after and I definitely think it was.  I had a fair amount of clean up to do on this piece and just dipped q-tips in a bit of water to help get any large smudges off.  It took some time but eventually I got it cleaned up to my liking while still leaving a few stray bits to keep it looking hand done. 


Here are the two finished pieces together.


I could see so many possibilities with this, using my Cameo just took so much of the stress of free hand drawing away.  If you don't have a Cameo you could still design your art, print it out on your home comptuer and cut it out with a sharp craft knife and go from there.

I have a few more hand made items for my wall so I'll share those as they get done.

Monday, August 6, 2012

Memory Lane

Sorry I didn't post on Friday but my sister in law is in town with my two nieces and we are having a blast.  They flew in to San Francisco last Tuesday so we drove in to pick them up.

We had lunch in Alameda at one of our favorite restaurants.  We all grew up in Alameda so it was nice to go home for a bit and have some yummy food.

After lunch we did a little tour and drove by our old houses.

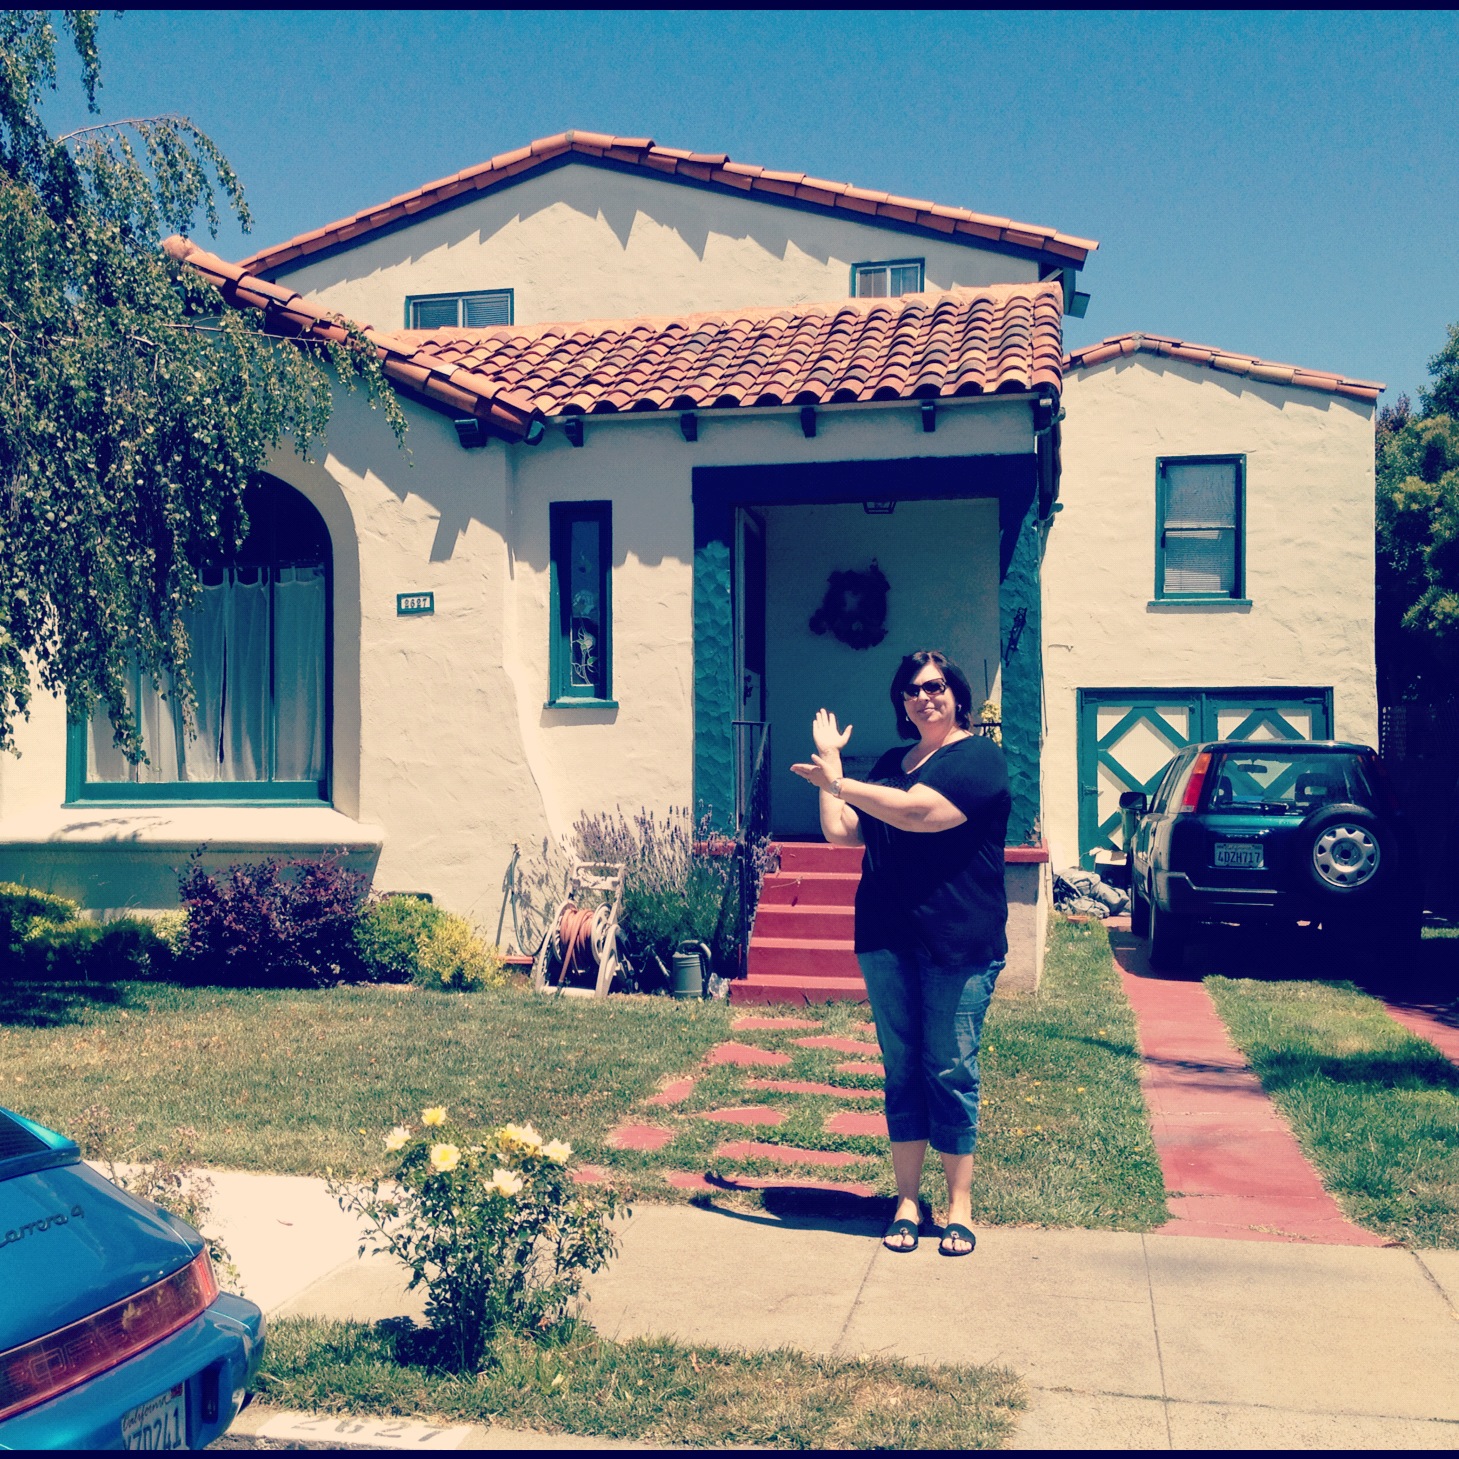
This is the house I grew up in, it sure looks small now.  My room was the one above the garage.  I helped my mom plant the birch tree that you can see on the left.  Nice to see that its being well taken care of, but I'm not diggin' that green trim.


We also drove by Larry's mom's house and the first house he ever owned in Alameda. 

We drove into San Leandro and drove by that house too.  It's only been two years since we sold it and it was the house Simone was born in.  Sadly she didn't remember it from the outside.  It still looks exactly the same as the day we left it.  


I really want to do a scrapbook page of all the houses I've lived in.  Hopefully that happens one day.

Friday, July 27, 2012

Olympic Fever takes over

It happens every two years, the Olympics!  We love watching them, especially the summer games.  I'm beyond excited to watch the opening ceremonies tonight and see all the events.  I just know London will put on an impressive show!  I also hope that Simone will enjoying watching some events, we especially want her to watch the swimming events and I know she'll love all the gymnastics too.  Wouldn't it be awesome to see them live in person!  Since we couldn't be there in person, what better way to share in the fun than Olympic themed decor!

Wednesday Simone and I were playing around with the Cameo cutting out a Nemo fish and I came upon a super cute Union Jack Mini Cooper print and cut.  I decided to print some out thinking I would decorate our guest room for my sister in law who's coming to visit next week.  She has a Mini that looks just like it.  It turned out super cute and it got me thinking about the Olympics so I went searching for other Olympic themed cuts.  I found a few that I really liked and the next thing you know I was a cutting like a mad woman. 

My cuts evolved to this a cute banner for our family room to keep up during the games.


Here's a closer look at the pieces.


I cut this Team USA piece last because I didn't have the right glitter cardstock so I had to run out yesterday to pick some up.  The top Team USA piece is the original cut file.  I traced it and made an offset for the silver glitter paper.  After I did that I did an offset of the silver cut file to make another larger offset for the blue glitter paper.  They layered exactly how I was hoping it would look.  I ran all the pieces through my Xyron 500 Create-A-Sticker so I could stick them down really well.  The back of the glitter paper can be tricky to stick down since its so slick.  I absolutely love this!  This is a prime example of being super happy I didn't toss that Xyron ages ago, its been sitting collecting dust for years not getting any use!


Next is the Olympic Torch.  I cut the handle from bronze POW glitter paper and the flames from regular cardstock.  I needed to stick the handle to something else because the POW paper is so thin so I assembled the torch pieces as they would look when it was finished, traced around the edge and created an offset.  I then cut that file out of plain white cardstock and stuck the pieces down to it.  It helps give it more rigidity for hanging as well.


The Union Jack Mini Cooper was the only print and cut.  This one was super easy but so cute!

The Heart was a bit of a pain.  I'm still learning the Cameo so I believe my issues with this one were just not having enough experience with the machine.  It took a few tries to get it right and I had to piece it together more than I was hoping to have.  One thing I thought about after I had finished was I should have just colored in the pieces and turned it into a print and cut and it would have been much easier.  It looks great finished so I guess that's all that matters.


This London Games Logo was a challenge as well.  I had to separate all the elements to cut them in the right colors and when I was finished and started to assemble the pieces I knew there was no way I could hang it from a banner, it was just too delicate.  I had to have a base of some sort so like the torch I assembled the cuts the way they would look finished, traced around it and made an offset.  I also ran the pieces through the Xyron to make sure all the small bits were stuck down.  I did this one first so by the time I got to the Torch, I had my system down.


Here are a few more shots of it hanging.  Simone made that super cute Olympic Torch during craft time at our gym, I thought it was the cutest thing and goes nicely with my banner.


Let's hope the good ole USA brings home lots of Gold, we'll be rooting all of the athletes on from our own little Olympic Village!

Enjoy the games!