Showing posts with label Craft space. Show all posts

Monday, September 12, 2016

My space, its always evolving │ Revised


Its hard to believe that three years ago almost to the day I uploaded this post about my craft space. Its been one of the most popular posts on my blog and I see pins on Pinterest of it all the time which is kind of surreal. I really love to organize every aspect of my home so I'm so happy to know that my ideas have helped and provided a launching pad for other craft spaces out there.

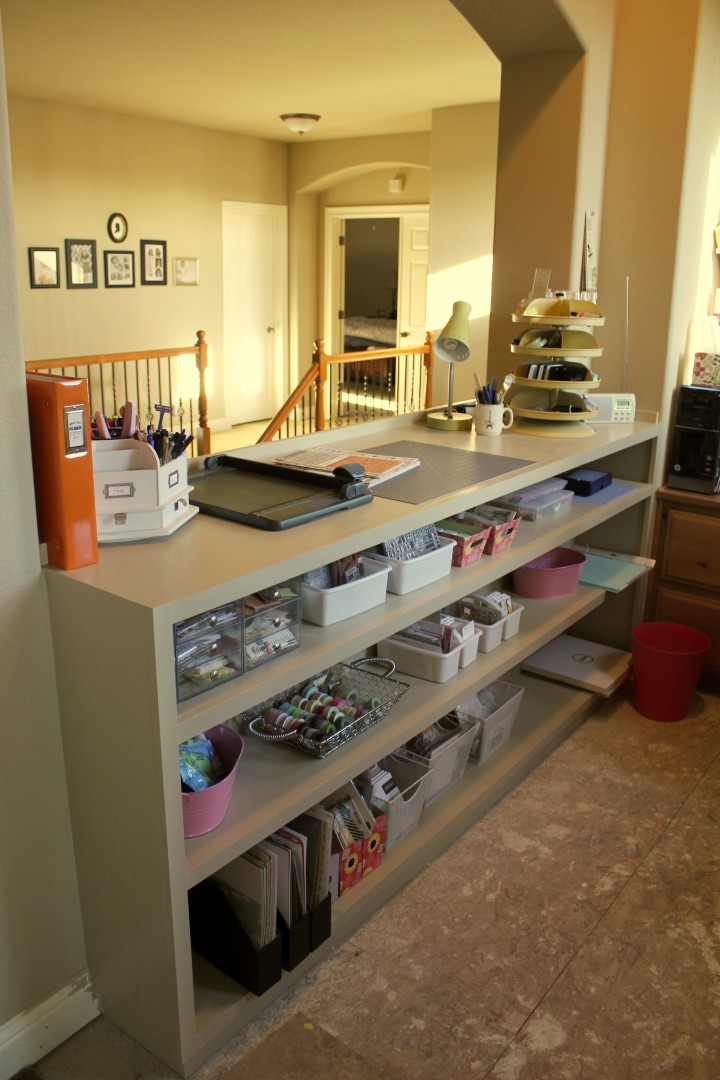
Since my original post I hadn't changed much about the space so it was long over due for an update. Over the past few weeks I've gone thru every bit of my space, removed all of my supplies and purged a hefty portion of them. Once that was done, and boy was it quite liberating I got down to business reorganizing and making it better. This photo above is how its looking today. Clean, organized, refreshed and much less loaded down with product and I couldn't be happier with how things have evolved.

I shared in my original craft space post links to the blog posts I had done sharing how this space came to be. It didn't always look like this and this standing bookcase counter top was custom built to fit the space by my husband. If you are curious about what the space looked like before you can see the posts here, here and here.


Here is a view looking into the space. This space is open to our entry way below and the two large windows are in a turret above our main entry.


Its filled with lots of natural light which is a blessing and a curse. These windows face east so the afternoon sun is quite intense especially in the summer.


Now for the nitty gritty portion of the tour. My Raskog cart from IKEA sits right outside the space. It holds all of my solid cardstock and specialty papers on the top tier. The bottom two tiers hold my stamps. All of my stamps are in Avery Elle storage pockets and you can see more about my stamp storage in my original room tour right here. I haven't changed anything about my stamp storage since then because its totally working for me.

Removing the two bins that used to sit to the left of my paper trimmer has made all the difference, I have so much more work space now. On a side note these Tonic paper trimmers are my favorite and if you like things cut straight and square you would love them. They are the only trimmers I have found that actually cut straight and square.


Under the counter is where all the changes were made. Scroll down below for detailed descriptions for each item.


  1. I decided to move all of my embellishments into these drawer units separated into categories that make sense to how I work. The drawers came from Target and they are from the Sterilite brand. You can see detailed images of them below.
  2. In this bin I have all of my product from Color Cast Designs. I'm on the Creative Team for this brand so it makes sense to keep all of my items together. I have some sets in original packaging and some leftovers have been combined into zip lock bags.
  3. These Kuggis bins from IKEA (not currently shown online but they were well stocked in my store) are a new purchase and I kind of wish I had used them across the top shelf instead of the drawers. They stack and are so sleek in design that I really love the clean lines they provide. In these bins I have larger flat stickers that come in kits, planner supplies like dashboards and monthly tab stickers, my enamel dots, and miscellaneous tags.
  4. These three bins that came from the Target dollar spot hold all of my Kelly Purkey stamps and products. I'm on the Creative Team for this brand as well and again it makes sense for me to keep all of my supplies together.
  5. This wire bin, also from the Target dollar spot holds my 6x6 paper pads
  6. These Tjena boxes from IKEA hold all of my pocket page cards. I have modified the inside sections to hold my cards in color categories, you can see that image below. The bottom box holds cards that I didn't want to keep categorized by color and some really old Studio Calico kit cards from 2013, 2014 that I need to purge.
  7. These vertical bins hold a lot of various things like large size stickers, watercolor paper, specialty media for my Silhouette Cameo and page protectors in various sizes.
  8. This Samla bin from IKEA holds mini album supplies like inserts and attacher stickers as well as any brand new products that are still in original packaging. My intent is to not let this bin get too full, I want to use the new stuff that I buy.
  9. These two wire bins hold all of my Thickers and large sized alpha stickers. They are sorted by color.
  10. This bin holds all of my twine and embroidery floss and supplies for hand stitching.
  11. These bins hold all of my washi tapes, sorted by color.
  12. My Silhouette Cameo, this sits on a shelf that pulls out when I need to use it. You can see a better picture of it pulled out below.
  13. These various sectioned containers hold sequins, my flair collection and small veneer pieces. Inside the red bin are small size alpha stickers sorted by color.
  14. This is a small collection of mini albums that are either in process or about to be in process some are small sized binders and one is a Heidi Swapp planner. I also have some scrapbooking magazines that I like to keep and a reference binder of ideas and computer how to's for Photoshop Elements.
  15. This bin holds all of my Silhouette Cameo supplies, like sketch pens, extra blades and some stamp material.
  16. This bin holds all of my small tools like punches, my heat gun, planner hole punches and stuff like that. Standing next to it is my Cuttlebug and the plates for it.
  17. My supply of photo paper and other plain printing paper.

Here is the image of my small drawers. I have my supplies categorized by vellum pieces, puffy stickers, gold bits, clips, large acrylic words, die cuts, word strips, veneer, plastic or rubber pieces, patches, chipboard and post its.


Here is a look at how I have separated out my pocket page cards. I decided to organize them all by color back in March and it was the best decision I have made. Its so much easier to find what I want since I tend to always work based on color. The back two sections hold 6x4 cards and the front sections are all 3x4 cards. My sorting categories are; red, orange, yellow, green, blue, violet, neutral, white, black and white, multi, fill in, specialty, metallic, calendar and seasonal.


Here is the image of my Silhouette Cameo pulled out and ready to cut. There is enough space behind the cameo for the mat to move around as it needs to while cutting. Its always connected to my computer which sits just to the right.


Here is a look at my table top. The blue bins on the table top are from Land of Nod, not sure if they are still available. The small white drawer organizer was from the Target dollar spot and it holds my adhesives, tiny attacher and rotary cutter. The round spinning holder came from Home Goods and it holds clips and my skinny washi tape collection. The tall 4 tier revolving tray is from Harbor Freight and it holds all of my roller stamps, small prima ink pads, mists, adhesives, stamp blocks and small items that I use all the time. I have a post here on my blog about the piece and the painting process if you are curious.


Right as you enter my space are these shelves, they hold a lot of different supplies that I don't need to get to all the time. The bottom shelf also holds all of my ink pads.


My computer sits on the table top and to the right side is a large counter work space. Under the counter are all of my in process 12x12 albums, my current 2016 album. I also have a bin of monthly kits that I haven't used yet or that haven't broken apart yet.


Here is a look at my inspiration wall. Its changed a bit since my original post, I switched out some of the art.


Phew, you made it to the end. Its a lot to absorb for sure. If you have any questions about anything please don't hesitate to leave me a comment below.

Now that its all clean and tidy its time to get busy making and boy do I have a good sized to-do list!

See you soon,

blog signature 012615

Monday, February 17, 2014

the leftovers have a new home

It's been over a year since Studio Calico first introduced their Project Life® kits and I have enjoyed each and every one of them.  I started my subscription the minute they announced the kits so my sub goes way back to January 2013.  I have absolutely loved the variety and mix of the kits and had a great time this past year incorporating them into my spreads.  Because I'm so photo heavy I don't always use every card each month so there are always a few leftover.  I have done an okay job of keeping them together but was never super organized with them.

I typically keep the most current kit out and all together and pull from it as I'm working on my spreads. When a new kit would comes in the leftover embellishments get merged with my supplies or passed on to my daughter it if was something she really wanted.  The leftover cards were placed in a bin off the top of my work space in no special order but typically placed in front of the last months cards.  I would pull from them a lot if the current kit didn't have exactly what I needed or if I remembered a specific card from a previous kit that was a good match.  Because of that they didn't always stay in perfect order.

When 2013 ended I new I wanted to organize those leftover cards in some way but wasn't finding the best solution out there.  I have seen some really awesome organizers but the 4x6 and 3x4 cards were always in separate sections and I really wanted the whole months kit together.

I've been using these bins to hold all of my stamps and while I was out shopping the other day I saw one and it dawned on me that it was exactly what I needed.  I don't know why I didn't realize it before but perhaps seeing it on the shelf empty I was able to see the potential.  The size of bin is 11" x 7" x 3.5" and while it looks small you will be surprised how much it holds.


I decided to make dividers from some plain white cardstock and they are sized 6" x 5".  I have saved the cute little stickers that come with the kits and applied them to the top left corner of the cardstock dividers. These stickers are meant for the spine of the storage boxes which I have saved and use for other purposes. I have since found my sticker for Roundabout which I believe was the first kit that came in the box.  I don't believe a sticker came with the Valley High kits if I'm remembering correctly so that might be why I can't find that one.


Behind each kits divider I have everything related to that months offerings.  I added the card that comes with each kit


In this case for Sugar Rush I have the cute little Valentine addon that was available that month


the 3x4 main kit cards and any from addons that I had purchased.


the 4x6 cards


and the 4x6 paper pads if I purchased them


Now for the most part my cards were kept fairly well together but there were quite a few that needed to be put back in place.  What I did was lay out post its for each kit with the month and name written on it.  I started with the 4x6 cards and placed them in the correct months then I did the same for the 3x4 cards.  I also did the same for the addon cards but since these typically did not have rounded corners I had already pulled them out of the 3x4 card stack so it would be easier to sort.  I found that it definitely helped to work in smaller batches.  If I didn't know what kit it was from I would pull up the kit card images from the Studio Calico site and match the cards that way.  It didn't take too long and thankfully since I had used a good portion of my cards I didn't have a ton to go thru.  There are still some cards that I can't identify, about a dozen but I think they might have been from class kits so for the mean time they are in the last section under Misc until I can figure them out.  But I'll tell you going thru each one card by card sure made me realize how awesome these kits have been and how many great cards I still need to use.

For the kits that did not have the cute little label I just ran the dividers thru my printer and using a typewriter font labeled each card with the kit name, month and year similar to the labels.

At the back I also separated out any cards that were sold as extras as you can see below.  It made more sense to me to keep these separated by designer.


This is everything all together in the one bin.  As you can see there is still plenty of room for more cards to be added as the months go on.  Eventually I'll need another bin but not just yet.


I hope this storage solution helps you in some way, it sure is nice having them all in one place and back in kit order.

post signature

Monday, September 9, 2013

My space, it's always evolving...

If you have a dedicated craft space I'm sure you can relate to getting tired and overwhelmed and feeling like you can't find what you want when you need it. That was me the past week or so and I've been fiddling around with where I would put what and how to improve my organization. I think it started with a complete overhaul of how I stored my stamps and then it went all crazy.

Here is where I stand as of right now


A little over a year ago my husband built this counter and shelf unit for me (you can see my posts on it here, here and here) and its been great. It holds everything I need it to hold and it completely transformed the space and made it much more usable than it was originally.


The first thing you see when you enter is my Raskog cart. I use the top tier to hold 4 paper organizers. The front one is pattern paper, the second is colored cardstock, the third is a continuation of colored cardstock and woodgrain paper and the fourth is all specialty paper like vellum, transparencies, glitter cardstock stuff like that. The two lower bins are all things I don't need that often so they're stored here, larger size punches, blank tags, etc.

Underneath the counter I have most of my supplies. I'll walk you through what's in each below. All of the white wire bins were purchased at Target in the dollar section. Whenever I see them come back I buy a few more, they fit perfectly on these shelves and I can pull them out as needed.


  1. These clear acrylic drawers hold odds and ends like seasonal sequins, seasonal stuff, misc. die cuts, tabs, sequin bits I want to hide from my daughter, ha!
  2. This bin holds all of my 6x6 paper pads and some extra stock of journaling cards that I have purchased
  3. Large veneer pieces and back stock of veneer sets that I love
  4. Leftover Project Life kit cards from previous months, I still go back to past months all the time so I keep them handy
  5. My washi collection
  6. My larger stamp press, stamp cleaning pad and baby wipes for clean up
  7. Embroidery floss and twine and this is where I keep the Amy Tangerine stitching templates.
  8. Rubber stamps, this bin is all Studio Calico (I'll talk more below)
  9. Rubber stamps, all other manufactures and designers
  10. Misc. wood handled rubber stamps, small wood alpha stamps, a few Prima sets and some stamps from Typo
  11. A bin of pigment ink pads and embossing powders and a roll of waxed paper
  12. These paper bins hold lots of things like 12x12 alpha sheets, large size sticker sheets, all of my masks, specialty materials for the Silhouette and odd size page protectors
  13. My supply of various watercolor papers
  14. A small stash of specialty mini albums and my still incomplete This is Me album along with supplies for it and the bag is a bunch of memorabilia I want to include in it
  15. Thickers and letter stickers these are colors. They are sorted by color and I made tall dividers from chipboard
  16. Thickers and letter stickers these are black, white, brown/kraft, gold and silver
  17. my Letterpress supplies; inks, plates, paper, etc.

18.  Sequins, veneer and other small embellishments
19.  My Silhouette Cameo
20.  A bin that holds my heat embossing tool, a small trimmer, a small cutting mat, a glass cutting
       mat and my ancient Creative Memories circle cutter
21.  My typewriter (its usually covered so it doesn't get dusty)
22.  4x6 Photo paper, some older magazines I've kept and a binder of class handouts from
       previous classes I've taken.
23.  My letterpress plate and Cuttlebug
24.  My Cameo mats (old and new) and my supply of 12x12 Project Life protectors in the boxes
25.  Regular paper for my printer and 8 1/2 x 11 sheets of photo paper and matte photo paper.


Here you can see how the Cameo pulls out for cutting. There is enough room in back for the mat to feed all the way thru the machine. I just pull it out when I need it and push it back in out of the way when I don't.


I'm a see it or I won't use it type of person so on top of my counter I have these two Ikea Samla bins for embellishments. I was using the Antonius inserts but find that these offer more flexibility because the sides are completely open so for odd size packs of embellishments I don't have to worry about the size of the bins, they all fit in. I put a few smaller plastic bins inside to hold loose items like alphas and misc. cuts that have come with the kits and such.

My Tonic trimmer sits right next to that.


In the middle of the counter I have a Fiskars cutting mat that I use as a work surface, mainly so the painted counter doesn't get too messed up. Behind it I have a two containers from Land of Nod, the left has my current Project Life kit cards and some special ones I haven't used yet, some letterpress cards I made, some special packs of cards I've purchased, the 4x6 kit cards and the mini alphas that come in the kits. Next to it on the right is the other Land of Nod container that I use for all of my tools and pens. In front I have a container that holds my Peerless watercolor papers and a little organizer that holds special paper clips, some flair and other specialty bits from the kits. The little round tub holds small embellishments from the last few kits that I haven't put away yet or that I still want to use.


To the right of my mat I have a light, my husband pulled the electrical outlet that he covered when he installed the counter up to the top so I could still use it, my radio also plugs in here. My Harbor Freight rack (that I spoke about in detail here) holds all kinds of stuff as you can see. Mists, acrylic blocks, my most used stamp pads, all of my roller stamps, my adhesives and small tools.


When I initially moved all my stamps to the Avery Elle pockets last week I had them in one of the Samla boxes I have on top of my desk. It worked really well and I did like it but my stamps were a bit tight and I couldn't flip thru them as well as I liked. While I was shopping at Home Goods I found these bins for organizing your pantry and they are a better fit. The best thing is they fit on my shelf.


I ran the cardstock inserts thru my printer and added the stamp manufacturer/designer on each in the upper left corner and that's probably all of the labeling I'll do. I like to be able to move things around so labeling the card stock and not the outside of the sleeve means I can move things around as needed. In this bin that is all Studio Calico I have them sorted but not too rigidly; in the front are all alpha sets, then the larger 4x6 sheets, the slim 1x6 sets, then the smaller 2x2 or odd size sets (I combined as many as I could fit in one sleeve as you can see above) and last are the red foam mounted background stamps.  I did not adhere the sets to the cardstock and even with standing upright, they don't move around inside which is a plus for maximizing space.

The other bin is sorted alphabetically by manufacturer/designer name.

I purchased 75 sleeves and inserts and used 70 of them between the two bins. There are tons of stamps in these 70 sleeves so they are awesome for holding lots of stamps.


This is the view as you walk in, there is a counter with my computer, printer, nasty cords that need dealing with, some shelves with bits on them and a larger work surface that I lay stuff out on.  The natural light from the two windows is awesome except in the afternoon, (it faces east) so my mom made the sheer curtains for me to help block out the glare without loosing the light. My husband also recently changed out the overhead light for me. It was a flush mounted fixture but because the ceiling is so high in the space it didn't give much light at night. I purchased a 5 light chandelier that directs the light downward an its made a huge difference at night.


So that's pretty much it, if you have more questions let me know.

Edited: I have revised my craft space tour, if you are interested you can see the updated tour right here.
post signature

Friday, July 20, 2012

Construction Project - Part 3 | My wheels are spinning freely!

I'm sitting at my desk and my chair is gliding effortlessly over my brand new tiled floor!  Larry's been working the past three days getting the floor done for me and its fantastic!

Here are some photos...

Day 1, he laid the cement board


Day 2, laying the first tile


the first row done

all in and drying

Day 3, grouting


Today, all dried and ready for me to roll around on.


It still needs one more polish that he is waiting to do as we speak and then he has to stretch the carpet back to position and tack it down.  I thought about putting in a transition but I think we'll see how this works for awhile and if I need one later we'll add one.

The curtains are next and will be tackled next month when my mom comes to visit!

For now though I'm going to enjoy my smooth and slick floor!

Friday, June 15, 2012

Construction Project - Part 2

Well the construction project is humming along quite nicely!  Larry painted the cabinet for me on Monday and luckily we had just enough of our left over touch up paint to cover it all. 

It came out great and really blended in so well with the house.  My sister in law saw it yesterday and thought it had been there the whole time.  Kudos to Larry and his awesome carpentry and electrical skills!


He added some trim to finish it all off.


Here is a look from the backside.  The backsplash will be perfect to keep stuff from falling over.


I wanted to make sure the paint had plenty of time to cure before I loaded anything in so I waited until yesterday to do that.

Here is a look at the shelves with my stuff placed in.  I still have some more organizing and fiddling around with where everything is, but for now it's all there.  I figure I'll live with it awhile to decide how I work in the space and see what needs to be changed.  For now it's awesome and I love it.


Here's a closer look at the shelves.  Over on the right had side on the top shelf (close to my computer) is where my Cameo will live.  Larry is going to build a pull out shelf for me so I can just pull it out and cut and slide it back in.  Right now I have to move things around on my desk to use it so I really want it hooked up and ready to go whenever I want to make a cut.  I'll be sure to post a picture when that's all set up.


On the top right of counter I set up a light, my radio and my Harbor Freight revolving storage trays.  Having that outlet there sure was a great idea.  My light has an extra outlet in it for when I want to use any other tools which is nice.


The left side has my Project Life album, a making memories lazy Susan and my paper trimmer.


I placed down a cutting mat that I had and plan to use this as my work surface for now.  I read on line that some folks use oven liners to work on since they can handle the heat, they are also non stick so I may pick one up so I can emboss right on the top of the counter.


We had someone give an estimate to tile the floor and it was ridiculously high.  We need to figure out where to proceed on that.  Larry may just end up doing it himself but we need to either buy or rent a tile saw, since he doesn't own one.

I also need to find a new light fixture and I need to figure out the window covering situation.  This is an older photo from this blog post on my previous work space organization, but as you can see from this picture, the windows over my desk face East, so I have major sun issues in the late afternoon.  They are also tall and narrow with a slight arch which translates to custom or expensive however you want to look at it.  Any suggestions would be happily accepted.

I'll be sure to keep you posted as we finish the last little bits of my project.  I'm just so happy with how this whole thing turned out.

We are planning a fun Father's Day here so I hope you all have a wonderful weekend.  See you back on Monday for a recap on that.