Tuesday, December 29, 2015
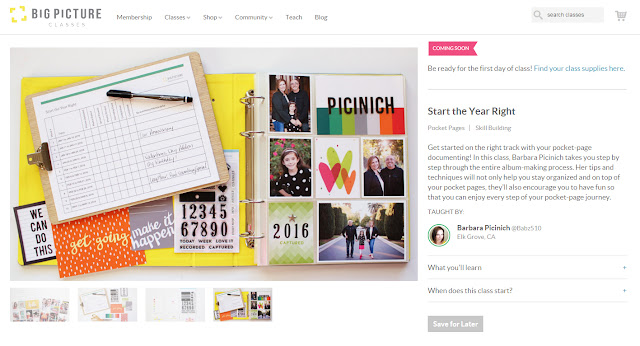
Big Picture Classes │ Start the Year Right
I have some super fun and exciting news to share. I'm teaching a class over at Big Picture Classes! The class is called Start the Year Right and my goal with the class is to provided you with some organizational and planning tools to start your Pocket Page project off on the right foot. I worked on this class this past November and it is to date the biggest project I have ever done completely on my own. I've been a contributor to many classes in the past but standing on my own two feet on this was a tremendous challenge but one that I enjoyed completely. I worked really hard on the content and I hope that you love it. My sincerest of thanks go out to the folks at Big Picture for asking me to develop this class for them.
Along with traditional scrapbooking I have been doing Pocket Page scrapbooking for six years now. Over the years I have streamlined my process to be as efficient as possible to stay on track. I'm hoping in the lessons and three videos I will give you some fresh ways to think about how you work so that you too can work efficiently.
There is a stamp set and some printable cards that go along with the class and there is also a free printable tracking sheet too.
The class starts on January 3rd, just it time for the new year. I look forward to interacting with all of you in the classroom so I hope to see you there.
If you are not yet familiar with Big Picture Classes, they are a subscription based site and the monthly subscription is $9.95 per month. With that subscription you get access to all the main class content on the site. They also offer premium classes that are sold on an individual bases. The class list is extensive as is the list of teachers, some of the best of the best are teaching classes there and the content is really, really good. You can start a free two week trial right here and start taking a look at all the classes they offer including my class when it starts.
Thanks so much and I can't wait to hear what you all think of the class.
Monday, December 28, 2015
Featuring Kelly Purkey │ December Release
Its release day over at Kelly Purkey's shop and its a great one! The reason its so great is she is now offering subscriptions to her monthly kits!!! How exciting is that! You never have to worry about things selling out before you have a change to order. You can sign up for a three ($24.50 per month), six ($22.50 per month), or twelve ($20.50 per month) month membership at a discounted price. Each kit contains a limited edition 4x6 stamp set, set of sixteen 3x4 double sided cards, set of four 4x6 double sided cards, one 4x6 sheet of printed labels, two 1" badges, and one 6x8 alphabet sticker sheet. You can read all about the new subscriptions right here.
The kit this month is called Today, and I used it in the above Project Life® spread and it was so fun to work with. Here are some more detailed images.
I love the little circle stamps and had fun layering them on the cards and my photos.
Here is a closer look at the stamp set in this kit.
My next projects featured the new Metropolitan Alpha set. I love a good bold and graphic font, especially one that can stand so well on its own.
My first project is for my December Daily® album, specifically Day 22. I desperately needed to see some snow so we set off to find some and it was perfect. I stamped the word Snow three times and then embossed it with white and a little silver glitter mixed it and I love how this turned out. The song lyrics were typed first and printed right on to the cardstock prior to stamping and embossing.
I used the Metropolitan number stamps to add in my day number.
My next project was a little throw back to the summer and the best concert I have seen in a really long time. I haven't been to New York in a really long time but I really wanted to use the I Love New York stamp set so this layout was born. Welcome to New York! My little homage to Taylor Swift and the opening number of her 1989 concert and the best capture of a really surprised and amazed little girl.
I used the Metropolitan Alpha to create the title stamping it in Brilliance White Moonlight ink adding in little bits from the stamp set to help set the tone. I scattered gold glitter starts around for some dimension.
Here is a close up image of the stamp set so you can see all that it includes. I love that she added in the subway letters, how cool are those. It sure makes me want to jet off to NYC really soon.
See you soon,
Monday, December 21, 2015
December Daily® 2015 │ Days 16 to 20
Somehow in spite of it all I have managed to stay caught up and it feels like a bit of a Christmas miracle. This month has flown by and my Christmas spirit has been hiding from me this season so working on this project has been somewhat of a blur for me. I know once the day comes and I can enjoy and soak it all up I'll look back on these pages and know that even though I felt like the spirit wasn't in me it really was the whole time. Being an adult this time of year and working so hard to make sure that the season is magical and special for someone you love is a huge task and one that take on wholeheartedly. I think sometimes I forget to keep the magic inside for myself too and I plan to spend the next four days doing just that.
Day 16
I can't remember how far back I started this but I know it was probably around the time that she was three. But every year since then I have picked out a special wrapping paper that was just for her gifts. It makes wrapping so much easier because I don't have to label her gifts. They are just there in a pile and she knows they are just for her. The past few years she has wanted to pick out her paper herself so its always a special trip to Target to find just the right one. I love that she picked one so quickly and one that was so perfectly her right now.
To help separate the days I added in a star transparency with a big glitter star and the Story of Today banner from the main kit.
Day 17
Simone pretty much won the lottery with her teacher assignment this year, case in point this super cute little art project that she brought home from school. In real life its much bigger so I just scanned it and then shrank it down to size to fit on top of the cute winter scene embossed paper. I then cut it out on my Cameo using the print and cut feature right on to photo paper. It worked so well! She also brought home a super cute Elf Job Application and that is folded up inside the glassine bag. I used some of Kelly Purkey's Clearly Kelly Holiday stamps to decorate the front and I love how the Yeti pairs with the Elf. The Spreading Cheer stamp is also one of Kelly's stamps.
Day 18
Sadly her last day of school before winter break didn't go as planned and the flu bug hit our house. It's always hard being sick during Christmas time so this was a super simple photo and words type of day. The jouranling card is from In A Creative Bubble and the cozy blanket paper from the main kit worked perfectly here.
Day 19
When I made these stockings for our family right before Simone was born I intentionally left space on Simone's so that she could add things to it as she grew up. Things that meant something to her that told her story. This year she decided to add a heart eye emoji and I love it. I decided to try and use some of my metal craft dies to cut the felt and it worked perfectly. I could not have cut that perfect of a circle on my own for sure. The jouranling card on the right is also from In A Creative Bubble. I love everything she designed this year.
Day 20
In my attempt to find some Christmas Cheer we set out for some shopping in our matching sweatshirts. I paired the large photo with some jouranling cards from In A Creative Bubble and one from the main kit. I altered the card a bit to remove the date portion since I was using one of my large numbers instead.
I probably won't be back until after the holiday but I look forward to living the next few days to the fullest and fully embracing the season and all that there is to love and enjoy about it. I hope you all do the very same thing and Merry Christmas to each and every one of you.
xoxo,
Wednesday, December 16, 2015
December Daily 2015 │ Days 8 to 15
Well we successfully pulled off a pretty big surprise for my daughter. We flew her to Disneyland for 4 days to celebrate her birthday. My daughter has been reluctant to fly for the past five years and she recently started talking about flying again. After many conversations to gauge weather she was truly ready we decided to book the trip. The flight is only an hour so we thought even if it didn't go well, it would be quick. It ended up being a really amazing trip and she did so well that she is eager to take another flight. We are thrilled!
The flip side to travel in December is getting back and having so many days to catch up on. It was daunting to say the least but I sat down yesterday and today and got myself caught up.
Day 8
I didn't have a chance to work on this one before we left but I always try to get one good shot of our tree for the album. This was a quick and easy spread to put together just a photo and words. Which seems to be a theme this year. Simple. Simple. Simple.
Day 9
Its tradition that on my daughter's birthday I by her a big Mylar balloon but because we weren't going to be home on her birthday I did it a day early and made it part of the reveal that we were flying to Disneyland after school. I purchased the airplane balloon on line and had it filled at my local party store where I bought the giant number eight. As you can see I'm doing better about embracing her personality in the photos I snap and use. This one is so her and I love that.
I added in the envelope given to us at check in and adhered the baggage tags to the back side. The silver glitter alphas are from my stash and pretty old but I had all the right letters left, yay!
Day 10
I kept this super simple with just a few of my favorite photos from the day, my journaling is on the back of the pano pic of the tree. Thanks to a kind Disney photographer who took this one for me. He loved doing it and was very excited to see how it turned out.
We stayed at the Disneyland hotel this trip and the diamond postcard was in the desk for guests to send, I of course knew it would be perfect for this album.
They had some really fun and unique photo ops spread around both parks. This one for the Matterhorn was my favorite.
Day 11
Because it started on the right hand side I added in the transparency to help break up the days. As you can see above I added my number right on top of one of the circles on the transparency.
This elf was the cutest, her name was Cranberry.
We visited Santa and California Adventure and it was a brief visit but it was perfect and the message of what she wanted was delivered. Seeing Elsa and Anna was another highlight of the trip.
Day 12
Our last day in the park so just a few photos and some journaling about the last day. I was kind of disappointed in the holiday decorations this year. The castle is usually much more elaborately decorated but I think because its the 60th Anniversary the Diamond Celebration stuff is taking center stage instead. It was still lovely and the parades and fireworks were amazing, but to me it was just lacking the Christmas spirit I have seen and loved so much in the past.
Day 13
Our flight home and a simple picture and words about how well the flights went.
Day 14
Back home and back to school and boy was it cold. Well cold for us here in California.
I added in the screen grab of the weather I had snapped and it fit well on the back side of the tag.
Day 15
Our Christmas cards arrived right before we left so I didn't have time to send them out so I made sure to get them out yesterday.
Its become a thing for me to do something funny on the backside of our cards and this is what I did this year. I saw it on Pinterest so my friend who took our photos helped me make it happen. I created the text part of it myself in Photoshop Elements. It was super fun to work on for sure.
I'm so happy to be caught up again and hope that I don't have to work so hard and fast again this month. If you have any questions on what I used or anything else, please don't hesitate to ask below.
See you soon,

Tuesday, December 8, 2015
December Daily® 2015 │ Days 5, 6 & 7
I have some more pages to share today. I worked on these last night and I love how they came together. I wasn't sure I was going to use the 2" x 2" page protectors because I can never seem to make them work but I did this time and I love how they turned out.
Day 5
Here is another one of those days that actually happened in November but its part of the December Story so in it goes. I usually try to get this event the exterior lights and buying our tree in during the first week and as the project ramps up and I'm getting used to taking photos every day and making sure I have a story to tell, having these events in my back pocket to use really helps.
I bought this Santa Stops Here sign at Target this year and I knew it would be super fun to snap some photos with before it got hung up. As you will read below in my journaling it was a bit of an ah ha moment for me as far as how to approach and accept the changes in the dynamics of shooting photos of my daughter these days. She is growing up and is more eager to show her own personality in photos versus what I want her to do. A lesson that I am getting used to and learning to adapt to every day.
I sized the left hand photo of my husband and my daughter so that it would cover only two of the columns of the photos behind. I wanted some to peek thru but not all. The tab I used on this is from Ali's kit last year.
On the back was all of my journaling. I did end up purchasing the digital files of the paper and the cards for Ali's Main kit and used one of the papers for the background. I changed the opacity so the stars weren't too dark and also changed them to grey. The circle element on the top is from In A Creative Bubble I did recolor it and change the size.
I love these out takes and there were even more that I didn't use. They crack me up and I'm so glad that I have them and I know she will love looking at them in the years to come. I left one slot empty to add in my number and I like how that breaks it up a bit.
Day 6
It ended up working perfectly to have the back side of all of the 2" x 2" slots to hold lots of photos from our Gingerbread House day with friends. I kept is super simple and just added in a 6.5" x 4.25" photo on the right hand side and typed my journaling right on top. I added a little ribbon flag just because I thought it needed something three dimensional to keep it from looking too flat.
Here you can see the photos a bit better on a white background. I think they are getting a bit lost above when photographed in the album.
Day 7
I had the backside of the 6.5" x 4.25" photo to play with and because I had purchased the digital files of the cards and papers from Ali's main kit I was able to manipulate this card a bit to fit in my space. I just typed up the journaling below, leaving a bit of room for the tiny strip of washi tape. I stamped a sentiment from one of Ali's old December Daily stamp sets and added a tiny gold star to dress it up. I cut down my number to rest on top of the washi strip and I love how this turned out. The photo on the right is sized to 4" x 6" and I opted to leave it plain for now. I might add a tab once I know what is going on the back side.
I'm hoping I can get to today's story and get it posted but we have really big plans this coming weekend so there will be a delay in my posts. I'll be back soon to share those pages once I get them all done.
Have a great day!
Monday, December 7, 2015
Hero Arts Blog Hop │ My Monthly Hero Kit featuring Kelly Purkey
EDIT: Hi everyone, when this post and this kit went up for sale yesterday the Hero Arts website was blown up with eager customers. Because of that the site went down for a bit. The kits are still available and because of the issues yesterday Hero Arts is going to give away 3 of the My Monthly Hero Kits with the winners being selected from all of the blog hop comments. So make sure you leave comments below and on the other blogs for a chance to win. The contest closes Sunday, December 13th at 11:59 EST. You can read more on this post here.
Hello Everyone! I'm so excited to be participating in a blog hop today in celebration of the latest My Monthly Hero kit from Hero Arts. This kit was designed by Kelly Purkey and its a great kit for starting the coming New Year off right.
The full kit contains two 2.5" x 6" stamp sets, 3 mini neon ink daubers in pink, yellow & orange, 4 badges designed by Kelly, all packaged in Kelly's 4" x 6" wallet insert. The kit costs $29.99 and it is available right now today Monday, December 7th at Noon EST time on the Hero Arts site. You can find the kit right here and its only available for a short time and once they are gone, they are gone. I will tell you that they usually sell out very quickly so make sure you act fast. Here is a detailed shot of the main My Monthly Hero kit this month, I mean how cute are those little mini ink daubers!
There is also an add-on 3" x 3" stamp set to purchase separately for $5.99 which is perfect for creating your monthly budget.
Because I love to set goals for myself, especially in the new year I made myself a little tracking sheet that I can insert in my planner or keep out on my desk so I see it every day.
I started with a blank piece of 5.5" x 8.5" white paper, I like to use 32# paper when I make inserts for my planner. Its a lot thicker than standard copy paper and it holds up really well to daily use inside a planner. Because its a bit thicker ink doesn't bleed thru to the back side so you can easily make this double sided and still be fine.
One thing I like to do when I'm making something like this is adhere it down to my work surface so it doesn't move around. My work table has a mat on it that has measured 1/4" grid lines and I can use the grid lines to line everything up as I stamp. Keeping it secured down really makes sure everything stays true and square.
Once I had done that I just started at the top and worked my way down adding the stamps in as I went. I used the two stamps sets that come in the My Monthly Hero kit for this and only added in one other stamp set, Kelly's outline alpha stamp that was released awhile back. I used this to stamp the year. I added in a strip of washi tape to help separate the section and got to work stamping my check off circles.
I love this stamp and I love that the tiny days of the week fit inside perfectly. I used two shades of grey ink so that the circles were faint but the days of the week were a bit darker. When the time comes my plan is to use the ink daubers to mark off the days that I actually accomplished my goals. To eat healthy, to exercise, to craft and to have fun!
I added in the labels for each section and then had fun dressing up each section with some of the cute phrases. I loved that there are some really cute ones to compliment the goals. I think the Eat More Donuts is my fave.
At the bottom I added one last strip of washi tape stamped in one last sentiment and a few stamped stars. I can't wait to see all the circles fill in as the weeks progress and when its full I can just make another one and continue on my journey to meet my goals.
I hope this gives you and idea of what you can do with these stamps, I for one cannot wait to see what the other amazing ladies have made so make sure you continue on the blog hop and see all of the other projects. Here is a list of all the blogs so you can check them out.
Remember that once these kits are gone, they are gone and will not be restocked so make sure you act quickly!
I'd like to thank the folks at Hero Arts for asking me to participate in another blog hop, it's always super fun to get to create something like this and working with this kit was no exception.
Thanks for stopping by!
Hello Everyone! I'm so excited to be participating in a blog hop today in celebration of the latest My Monthly Hero kit from Hero Arts. This kit was designed by Kelly Purkey and its a great kit for starting the coming New Year off right.
The full kit contains two 2.5" x 6" stamp sets, 3 mini neon ink daubers in pink, yellow & orange, 4 badges designed by Kelly, all packaged in Kelly's 4" x 6" wallet insert. The kit costs $29.99 and it is available right now today Monday, December 7th at Noon EST time on the Hero Arts site. You can find the kit right here and its only available for a short time and once they are gone, they are gone. I will tell you that they usually sell out very quickly so make sure you act fast. Here is a detailed shot of the main My Monthly Hero kit this month, I mean how cute are those little mini ink daubers!
There is also an add-on 3" x 3" stamp set to purchase separately for $5.99 which is perfect for creating your monthly budget.
Because I love to set goals for myself, especially in the new year I made myself a little tracking sheet that I can insert in my planner or keep out on my desk so I see it every day.
I started with a blank piece of 5.5" x 8.5" white paper, I like to use 32# paper when I make inserts for my planner. Its a lot thicker than standard copy paper and it holds up really well to daily use inside a planner. Because its a bit thicker ink doesn't bleed thru to the back side so you can easily make this double sided and still be fine.
One thing I like to do when I'm making something like this is adhere it down to my work surface so it doesn't move around. My work table has a mat on it that has measured 1/4" grid lines and I can use the grid lines to line everything up as I stamp. Keeping it secured down really makes sure everything stays true and square.
Once I had done that I just started at the top and worked my way down adding the stamps in as I went. I used the two stamps sets that come in the My Monthly Hero kit for this and only added in one other stamp set, Kelly's outline alpha stamp that was released awhile back. I used this to stamp the year. I added in a strip of washi tape to help separate the section and got to work stamping my check off circles.
I love this stamp and I love that the tiny days of the week fit inside perfectly. I used two shades of grey ink so that the circles were faint but the days of the week were a bit darker. When the time comes my plan is to use the ink daubers to mark off the days that I actually accomplished my goals. To eat healthy, to exercise, to craft and to have fun!
I added in the labels for each section and then had fun dressing up each section with some of the cute phrases. I loved that there are some really cute ones to compliment the goals. I think the Eat More Donuts is my fave.
At the bottom I added one last strip of washi tape stamped in one last sentiment and a few stamped stars. I can't wait to see all the circles fill in as the weeks progress and when its full I can just make another one and continue on my journey to meet my goals.
I hope this gives you and idea of what you can do with these stamps, I for one cannot wait to see what the other amazing ladies have made so make sure you continue on the blog hop and see all of the other projects. Here is a list of all the blogs so you can check them out.
Barbara Picinich ← this is me
I'd like to thank the folks at Hero Arts for asking me to participate in another blog hop, it's always super fun to get to create something like this and working with this kit was no exception.
Thanks for stopping by!
Subscribe to:
Posts (Atom)