Wednesday, May 28, 2014

Letterpress

I think one of the most exciting trends to come out of the paper crafting world in awhile was the addition of home letterpressing.  Letterpress items seem to be everywhere these days and the fact that you can now do it at home is just so cool.  When Studio Calico offered their first Letterpress class last year I signed up immediately.  It was one of the funnest classes and I loved learning about how to do it at home and I loved how easy it was. 

Fast forward a few months and Letterpress classes are back at Studio Calico with Letterpress 2.0!  This class will be taught by one of my favorite Paper Crafters, Geralyn Sy and I cannot wait!


This is what you will get with the class
  • Detailed PDF from Geralyn with insight into how she fits Letterpress into her creative process
  • 1 video and 4 PDF tutorials sharing new techniques for Letterpress from Geralyn
  • Access to a class message board where you can discuss Letterpress with Geralyn and your fellow students
  • Challenges to keep you inspired and creating all month long! 

This is what you will need as far as supplies go
  • Lifestyle Crafts L Letterpress platform bundle
  • Studio Calico letterpress plates – Many of the techniques and inspiration pieces will use more than one design.
  • Manual diecut machine (The Cuttlebug, Epic, Big Shot and Evolution will all work with the platform. I have the Cuttlebug and its worked great for me)
  • Letterpress Paper (you'll want plenty on hand believe me!)
  • Letterpress Ink 

These are some additional items that would be nice to have
  • Cleaning Cloths – these cut thru the ink and make clean up so much easier
  • A large brayer – The letterpress bundle comes with an ink brayer, but you’ll find a larger brayer makes even inking on larger plates that much easier.

This class will also come with these printables and digital files so you can make complete projects.


Because the Letterpress 2.0 class will not include the basic how to's of home letterpressing they are also offering a Letterpress Class Bundle where you'll receive access to Letterpress 2.0 AND the introductory Letterpress class taught by Tina Aszmus in September 2013 . The introductory class includes 8 full tutorials, 6 videos and 30 great projects to get you started & is available only through the bundle purchase.  So if you didn't take that first class and want to learn the basic how to's first I would really suggest signing up for the bundle, you can do that right here.


Signs ups for both the Letterpress 2.0 class and the Two Class Bundle are open until 11:59pm EST on May 31st so make sure you sign up while you still can.  I can't wait for Letterpress 2.0 so I look forward to seeing you in the classroom on June 1st.


post signature

Tuesday, May 27, 2014

Hello Hello the full reveal

I hope you have all recovered from your long weekend!  It's hard to believe we are already in to the June kits, its gone so fast for me.  The summer kits are always some of my favorites and like I mentioned the other day, these were so much fun to work with.

Just a reminder that all links below will work as of right not 9:00am PST for subscribers.  Non subscribers can start shopping for the kits tonight at 9:00pm PST.

Here is my spread made exclusively with the Hello Hello Project Life® kit only.


I could not resist the orange and pink combo and luckily my photos from this week paired nicely.  I loved the little pink alpha and how it blended so well with the pink stripe on that one card, and the wood veneer & is so cool, love that font.  I covered it and the 5 with the Gold Wink of Stella brush pen and in person its so pretty.  I added quite a few digital brushes to my photos before printing them off.  I love how just a little accent here or there makes it that much better.  You can see all of the digital brush sets for the month here.


Shanna created a really great set of digital templates this month and I used one of them to create a focus on the top half of the right side of my spread.  I just adjusted the size of the photo blocks so they would work when cut apart. I also used the rainbow stripes on the two bottom slots and just changed the orientation to create my own cards.  That High Five card was one of my favorites this month.


My second spread was made with a few more cards from the Main Kit and lots of embellishments from the two Addons; Guten Tag and G'Day.  I loved the blue and green color combo and it paired just great with my week 20 photos.


More Digital Stamps printed right on cards or used to make my own, more wood veneer covered in Gold Wink of Stella and some amazing Kal chipboard stickers from Guten Tag.


Paige created two amazing cut files this month that I knew I really wanted to use, you can see them here.  I loved the circle cut file and opted to shrink the circles down for my title card and punched 1" circles from a few sheets of the 4x6 paper pad and even from the gold doily that came in the G'Day addon.  I layered them under the cut file on top of a sheet of paper and I love how the different patterns all work together.


The wood veneer sequins in the Guten Tag addon were so fun to work with.  I even stamped with them for some added dimension.  I just cut a tiny piece of double sided foam tape and stuck the sequin to the back end of my xacto knife.  I used a gold pigment ink and got a really great stamped image.  It definitely worked best on a smooth paper instead of a textured cardstock so keep that in mind if you try it.  I also added a bit of shine to the veneer with the Clear Glitter Wink of Stella Brush pen.


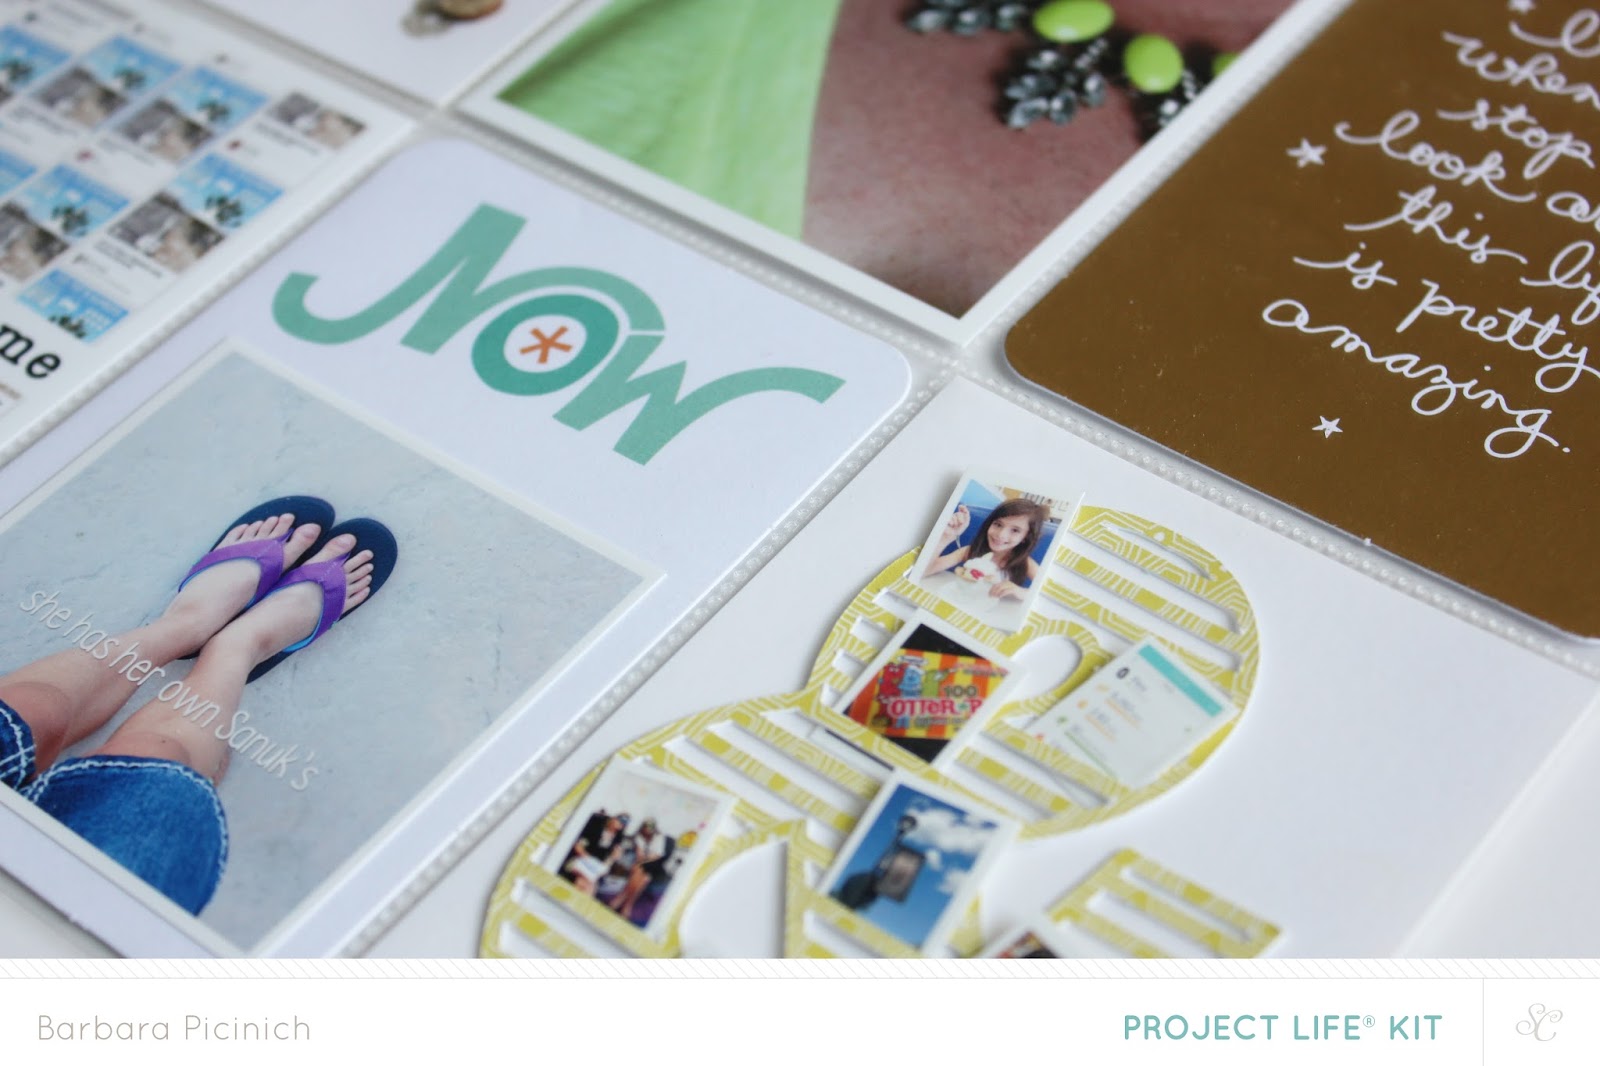
The & cut file was a last minute addition, I didn't know how to end the spread and was pouring over a few photos that I just didn't have space for and then it hit me, print them small and tuck them in the slats. I cut the & from one of the sheets of the 4x6 paper pad and and I loved how this worked out. The photos are super tiny in case you are wondering about 1/2" by 3/4" I just created a small template in Photoshop Elements and printed them out.


I think you will be so excited when the kits hit your door and I can't wait to see what everyone does with them.

Don't forget to check out the rest of the scrapbook and card kits this month, you can see everything here.  I especially Love the Stamp addons this month; Aloha and Howdy which even comes with a die!  Wafer thin dies are my new favorite thing to work with these days.


Enjoy the reveal and have a great week!


post signature

Friday, May 23, 2014

Hello Hello its Studio Calico sneak time

What a month, Hello Hello just rocked! I loved, I mean LOVED the main kit cards this month and the two distinctive color combos was amazing.  I made two Project Life® spreads because I loved them so much and my photos just happened to work really well.

Here are my main kit only sneaks.  That striped card, loved it so much and it pretty much dictated the whole spread.


I kind of went a bit crazy for the digital templates this month and these next two shots show them a bit.


My second spread focused on the second color combo and another version of the striped card I loved.


This & cut file from Paige is so awesome, I shrunk it down and made some super tiny photos to tuck in to it.


Paige's circle cut file was a must use as well.  I shrank it down as well for my title card.  The wood veneer sequins are amazing and I even stamped a bit with them which was lots of fun.


You can see some more sneaks for all of the Studio Calico kits right here, they really are fantastic this month. It's going to be another super busy reveal morning on Tuesday so if you are a subscriber, you will definitely want an early crack at all of the kits and addons and some extra special companion items you will see at reveal.

You can still get in on the early shopping by starting a subscription today to any of the kits.  There is even a risk free offer that is still in effect thru Monday 5/26.

Click here to subscribe but don't forget to add that code at checkout.

Have a wonderful long weekend and I will see you back here on Tuesday for my full reveal.

post signature

Friday, May 16, 2014

Digital Scrapbooking Classes at Studio Calico


This week has been crazy busy for me, I've been at my desk writing some tutorials for the latest FREE Class at Studio Calico that launched this week, its called Digital Basis and if you have ever wanted to learn about Digital Scrapbooking now is the time to do it.

Here is what is being covered in the class

Getting Started :
  • What’s the difference between Photoshop and PSE? We’ll show you how to download a trial of PSE so you give digital a try!
  • Downloading and opening files
  • Saving files

 Organization :
  • Organizing your SC digital files on the dashboard
  • Organizing files on your computer

 Printing Basics :
  • Setting Up Documents
  • Flattening Layers & Saving Files
  • CYMK vs RGB
  • Print Settings

There will also be tutorials on working with the Studio Calico Digital files, in particular;

Stamp Brushes : 
  • How to load the brushes
  • resizing and recoloring brushes

  Templates: 
  • Working with layers
  • Using a clipping mask

  Printables : 
  • Printing printable elements
  • Using printable cards and accents individual digital elements

  Digital cardstock : 
  • Ideas for using digital cardstock
  • How to edit and resize digital cardstock

  Cut Files : 
  • Setting up the workspace and blade / cut settings in Silhouette Studio
  • What’s the difference between .PNG, .SVG & .STUDIO?
  • How to trace a .PNG
  • How to turn on cut lines on a .SVG with Silhouette Studio’s Designers software

  BONUS : 
  • Incorporating text on photos and printables
  • Using SC digital with PicMonkey (a free program)

The tutorials I worked on for this class are Organizing your Digital Files (which is already live) and Working with Digital Templates and with Digital Cardstock (which will be posted 5/21).  They were a lot of fun to put together and I hope the information is really helpful to get you going with Digital Scrapbooking.

Here one version of the Templates that are being offered with the class files


Here is a sneak peak at the Project Life® spread I made for the class.


Learning how to incorporate Digital into my process was the best thing I ever did.  It seems these days that every single thing I make starts on my computer and I love how much versatility using digital elements provides.  I can turn any item into any color, any size and anything I need it to be with just a few clicks of my mouse and I love that about digital scrapbooking.

To sign up and get started with the Digital Basics Class click here.

And while you are at it I would suggest signing up for the next class being taught by Shanna Noel


Beyond the Digital Basics will continue along but get a bit more in depth with the ideas and instruction.  Here is what you will receive and a list of all of the digital files included when you sign up for this class.

What you'll get:
  • 10 how to videos from Shanna covering techniques for templates, stamp brushes, digital paper, printables and digital die cut files
  • 10 tutorials from the contributors covering techniques for templates, stamp brushes, digital paper, printables and digital die cut files
  • 20 new digital / hybrid projects to inspire you
  • a class message board to interact with Shanna and your fellow students
  • new challenges each week

Bonus Digital Files:
  • Digital patterned paper (Shanna Noel for Studio Calico)
  • Digital Templates (Shanna Noel for Studio Calico)
  • Digital Alphabet Stamp Set (Shanna Noel for Studio Calico)
  • Digital Stamps (Shanna Noel for Studio Calico)
  • Digital Embellishments (Shanna Noel for Studio Calico)
  • Digital Die Cut Files (Shanna Noel for Studio Calico)
  • Digital Washi Photo Frames (Shanna Noel for Studio Calico)

Here is a look at just a few of the digital files you are getting with this class.  Shanna did such as amazing job designing the items for the class.


Shanna has a really great intro video for this class and you can see more images and sign up right here.  

I sure hope to see you in both classrooms!

Have a great weekend!

post signature